Single Sign-On
Network Bowtie Controllers delegate single-sign-on via an embedded Dex service on each appliance. This documentation serves to bridge the gap between Dex configuration conventions and how they interact with your Bowtie Controllers.
Configuring SSO should be done during cloud-init via Seeding Configuration as YAML files or using the post-boot SSO setup process.
SSO Configuration
All *.yaml files placed in /etc/dex are merged into the top-level connectors YAML key for the final Dex configuration file.
A systemd service watches for any new or changed files in this path and will restart Dex accordingly so that any changes at boot time or after are properly ingested.
Each connector expects different keys depending upon the integration. Here are a few examples that illustrate some of the more common types.
Trusted SSO Groups
Take special care to ensure that you configure your chosen Dex connector to trust only a subset of users via a trusted group or similar mechanism. Failure to do so may grant access to your Controller to an unrestricted category of users such as any GitHub user or any user that has a GitLab account.
GitHub
The GitHub connector enables Bowtie Controllers to delegate authentication to GitHub. The following YAML block illustrates an example potential configuration file placed at a path such as /etc/dex/github.yaml either by cloud-init or after initial boot:
id: github
name: GitHub
type: github
config:
  # Replace with your actual Client ID
  clientID: 123456789abcdef12345
  # Replace with your actual Client Secret
  clientSecret: 123456789abcdef12345123456789abcdef12345
  # $DEX_ORIGIN is replaced at runtime with your Controller’s endpoint.
  redirectURI: $DEX_ORIGIN/dex/callback
  orgs:
  - name: my-organization
Note the setting config.orgs[0].name that enforces only members of the my-organization GitHub organization the ability to authenticate via Dex. Please ensure that you set an organization appropriately to guarantee that you do not grant all GitHub users the ability to authenticate to your instance, but only members of your organization or team.
Reference the Dex GitHub configuration documentation for what settings to configure on GitHub.
GitLab
Like GitHub, the GitLab connector should behave as expected on your Controller. Follow the configuration guide for the Dex connector to learn how to configure GitLab as an authentication provider.
The following file may be placed at a path such as /etc/dex/gitlab.yaml to configure GitLab as a single-sign on provider:
id: gitlab
name: GitLab
type: gitlab
config:
  # Replace with your GitLab Client ID
  clientID: aaaaaaaabbbbbbbbbbbcccccccccddddddddddeeeeeeeeeeefffffffffffffff
  # Replace with your GitLab Client Secret
  clientSecret: 1111111111222222222223333333334444444455555555566666666777777777
  # $DEX_ORIGIN is replaced at runtime with your Controller’s endpoint.
  redirectURI: $DEX_ORIGIN/dex/callback
  useLoginAsID: false
  groups:
    # Permit only my-organization to authenticate
    - my-organization
Note the inclusion of the config.groups[0] YAML key to enforce that only members of the my-organization GitLab organization can authenticate which is necessary to ensure that your instance remains private.
SAML
Dex SAML Support
At the time of writing, SAML support in Dex is unmaintained and thus we suggest using a maintained alternative to ensure that your chosen Dex connector receives regular updates and attention to events such as CVEs.
The Dex SAML connector is also supported. A variety of potential providers leverage this connector.
AWS Identity Center
This example will illustrate the SAML connector using AWS IAM Identity Center.
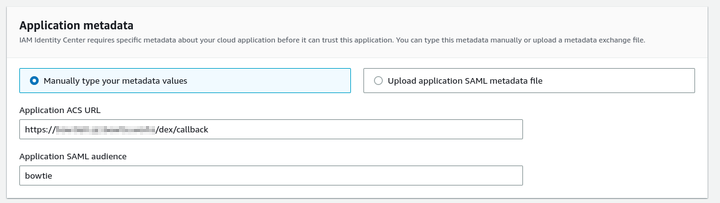
Begin by following the steps for Custom SAML 2.0 applications in AWS IAM Identity Center to create a custom application for Bowtie in your AWS account. Choose “Manually type in your metadata values” when creating a new application and enter your Controller’s ACS URL to match the Controller’s https endpoint along with the appropriate SAML audience. Here is an example of what this page may look like after filling in the required fields:
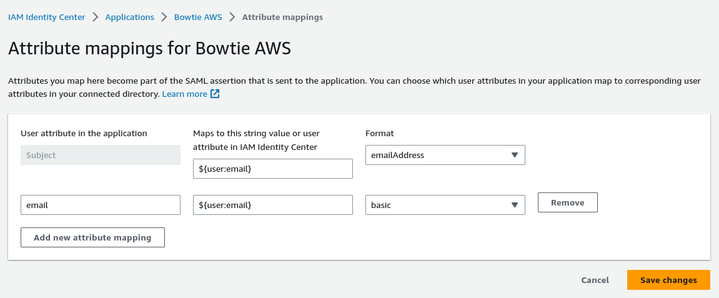
Once you’ve created the new application, configure any appropriate attributes that you’d like to reference in your Dex connector configuration:
Finally, define a connector configuration file at a path like /etc/dex/saml-aws.yaml:
type: saml
id: aws
name: Bowtie AWS
config:
  # Replace with your AWS SAML SSO URL
  ssoURL: https://portal.sso.us-east-2.amazonaws.com/saml/assertion/ABCDEF
  # Replace with your AWS SAML SSO Issuer URL
  ssoIssuer: https://portal.sso.us-east-2.amazonaws.com/saml/assertion/ABCDEF
  ca: /etc/dex/aws.crt
  # $DEX_ORIGIN is replaced at runtime with your Controller’s endpoint.
  redirectURI: $DEX_ORIGIN/dex/callback
  usernameAttr: email
  emailAttr: email
  entityIssuer: bowtie
  nameIDPolicyFormat: emailAddress
AWS SAML Authentication
Some users have reported the inability to initiate authentication from the AWS web console. If you are unable to authenticate into your Controller via the application widget in the AWS management console, begin instead from the Bowtie Controller side to proceed through the SAML authentication flow. Bowtie engineers are aware of this issue.
Google IDP
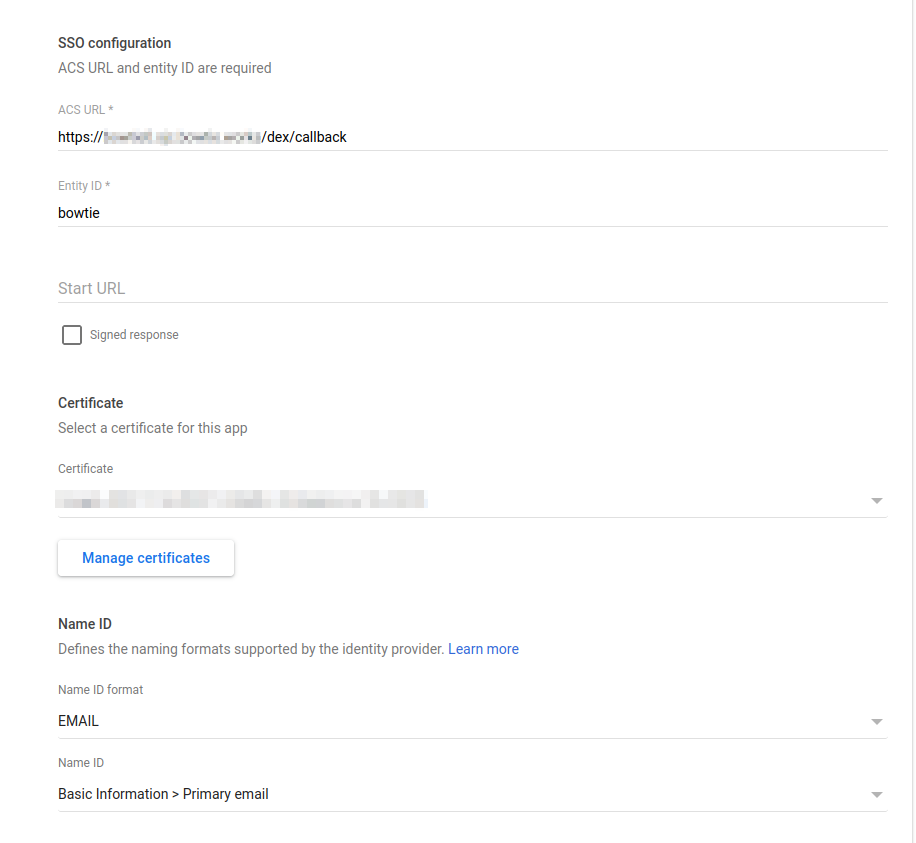
Google’s IDP service can also serve as the back-end for Dex SAML authentication. The following screenshot demonstrates some of the necessary fields to set when configuring Dex alongside Google SAML as an identity provider:
After configuring Google’s side of the SAML authentication scheme, create a configuration file similar to the following with the appropriate fields like ssoURL and ssoIssuer set to your values at a file path such as /etc/dex/saml-google.yaml:
type: saml
id: google
name: Bowtie Google
config:
  # Replace with your Google IDP SSO URL
  ssoURL: https://accounts.google.com/o/saml2/idp?idpid=aaaaaaaaa
  # Replace with your Google IDP SSO Issuer URL
  ssoIssuer: https://accounts.google.com/o/saml2?idpid=aaaaaaaaa
  ca: /etc/dex/Google_.crt
  # $DEX_ORIGIN is replaced at runtime with your Controller’s endpoint.
  redirectURI: $DEX_ORIGIN/dex/callback
  usernameAttr: name
  emailAttr: email
  groupsAttr: groups
  entityIssuer: bowtie
  nameIDPolicyFormat: emailAddress
After creating this file you should be able to initiate authentication through Google SSO for your Controller.