Controller Setup
Proceed through these setup instructions sequentially or jump to a particular section of interest. The outline for the entire process is:
Install the controller using an appliance or container image. Ensure that it is reachable over the public internet with the right ports open. Cloud users of platforms like AWS should define a cloud-init file before first boot to ensure that you have terminal access to the Controller and to optionally configure HTTPS, your Controller’s hostname, and SSO. You may optionally use Terraform or Helm for this step.
Configure Initial Setup. We also recommend using Single Sign-On. Browse to your Controller either via DNS that you’ve directed at your Controller’s public IP address or the plain public IP address if you haven’t configured DNS.
(Optional) Install any additional controllers by following Multi-Controller Setup.
Mission accomplished! Proceed to Client Setup to install the Bowtie Client on one or more assets in your network which will connect to the Controller that you’ve setup here. Any further Controller configuration can be performed over the web interface as outlined in Controller Operation or with the Bowtie Terraform Provider.
Remember that Controller SoS is available for assisted support at any time at any point after the Controller is reachable over the network and enterprise-level Chat Support is available for licensed customers.
Step Summary
Pre-flight Checks
Before you install a Bowtie controller, consider Controller System Requirements, your private networking strategy (where an appliance should be deployed), open port requirements, and whether to pre-seed configuration files or do so after first boot.
Controller System Requirements
In terms of resource use, a Controller behaves like a typical network appliance. We do not anticipate (nor have observed) heavy load during the course of normal operation, though your particular case may vary based upon number of users and volume of traffic:
A minimum of 2 cores is recommended for a basic installation. If your organization’s total number of client devices will exceed over one thousand nodes, consider 4 or more cores.
4GB of memory should be sufficient for most installations.
To accommodate for sufficient data retention across both application data and observability metrics and logs, a minimum disk size of 50GB is recommended.
In addition to normal application data (access policies, users, and so on), Controller cloud images ship with a collection of Observability tools. Your chosen disk size may impact the data retention period for data such as logs and metrics. For example, you may choose to dramatically increase disk size to retain several months of Logs. If you have needs for centralized log aggregation, please ask.
If you anticipate heavy network activity across your network control plane, ensure that sufficient bandwidth is available on any attached NICs.
For example, in terms of AWS EC2 instance types, m5.large is a known-compatible size. We strongly suggest using Nitro enabled instances to facilitate access to the serial console for Controller SoS.
We recommend modeling Controllers as easily replaceable “cattle” that can be scaled elastically. We build this assumption for reliable fail-over and scalability directly into both the server-side Controller and client-side Client software, so bear this in mind when considering your deployment topology. For example, if your on-premise hypervisors have relatively limited capacity, Bowtie can support many small Controllers rather than a few large ones.
If you need to fine-tune resource allocation based upon observed measurements in your environment, consider overestimating system requirements and then collecting usage numbers using Grafana.
SoS Serial Console
To reliably invoke the capabilities provided by Controller SoS over its REST API, read access to the Controller’s serial console is necessary. On some platforms this may require running the Controller on certain instance types or configurations. For example, EC2 serial console access requires an instance running on instance types that support the AWS Nitro System.
Network Requirements
As a gateway to network-adjacent resources, your controller should satisfy a few requirements:
Any private network resource that you intend to access through the Bowtie controller should be accessible from the Bowtie controller itself. For example, if you’re configuring a Bowtie network to facilitate access to a web application within an AWS VPC that has no public network address, your Bowtie controller likely needs to be installed within a subnet that is routable to the private subnet. A Bowtie container executing in a Kubernetes environment will be able to route inbound VPN traffic to any pod that the Bowtie application itself can reach.
The controller should be deployed under a network address accessible from the public Internet because:
Bowtie clients require a generally-available endpoint that they will use to establish private networking routes, and
The Bowtie controller will leverage its public address and DNS to acquire TLS certificates which are critical to ensuring secure access to its network endpoints (the Controller will not perform this step if you provide your own certificate material)
For example, if you install your Bowtie controller in EC2, it should be given a public network address and DNS name in route53 that can be resolved from any public DNS server. In Kubernetes, you will need to use an Ingress Controller to route inbound HTTP traffic as well as wireguard UDP traffic to Bowtie
Deployments.
In the cloud and other virtualized environments, a Bowtie Controller will solicit the network for DHCP addresses on all attached network interfaces. If your network instead requires a statically-configured IP address, please reference the static networking section under Seeding Configuration to set values like address, gateway, and more at boot time. The Controller Controller Networking documentation outlines how to make configuration changes to the network after initial setup if desired.
Self-Signed Certificates
Within environments that require trusting self-signed certificates (such as for TLS interception), you may choose to trust your root certificate on Controllers.
/etc Trusted Cert File
The typical file location for root certificate trust on Linux systems at /etc/ssl/certs/ca-bundle.crt is enforced at the operating system configuration level and will be overwritten to enforce the configured state if the file or link is changed.
Use the method described in this section instead to choose an alternative trusted certificate authority (CA) bundle.
Move your custom certificate authority bundle file onto the Controller. You may choose a path in
/etc/ssl/certs/without risking its deletion during Controller upgrades.Set the
NIX_SSL_CERT_FILEenvironment variable to the path of your certificate bundle for the daemons that should honor the self-signed certificate.For example, if a custom certificate bundle were present at
/etc/ssl/certs/custom.crt, the following commands would trust this bundle for all daemons necessary for a Controller to operate without errors behind a self-signed certificate:for override in /etc/default/{bowtie-server,dex,update} do echo NIX_SSL_CERT_FILE=/etc/ssl/certs/custom.crt >> $override done
Trusting the self-signed certificate bundle for each of these daemons effects the following:
bowtie-serverOAuth/SSO authentication steps against TLS endpoints, retrieving DNS block lists from HTTPS endpoints, licensing, and Control Plane support.
dexIf you are leveraging SSO against an endpoint secured behind a self-signed certificate, trusting the certificate from this daemon is necessary.
updateFor updates to function correctly, both version information and updated packages are fetched over HTTPS and must be set to a self-signed certificate if one is in use.
Other daemons that are not critical to Controller operation that may also need their trusted bundles set as necessary:
/etc/default/sosTo generate and deliver support bundles to Bowtie, Controllers send these payloads to an HTTPS endpoint.
/etc/default/backupdIf your backup destinations have a self-signed certificate in front of their endpoints, you may need to set the trusted bundle for the backup daemon.
Open Port Requirements
Required Ports
Bowtie controllers, in a default configuration, require ports tcp:443 for the HTTPS API and udp:443 for the Wireguard tunnel connection to be open in order to operate. Please be sure both ports are open and reachable from all sources. You can find more information about both required and optional port configurations below.
In order to ensure that your Controller can communicate with Clients and other network peers, all established network connections should be permitted via your platform’s network configuration control plane. For example, in iptables terms, you should permit state RELATED,ESTABLISHED to and from the Controller (this is presented as an example - if you’re operating within an environment like EC2, these types of state rules are likely already in-place, although you likely need to explicitly grant new outbound and inbound connections).
Kubernetes Ports
Within Kubernetes, an Ingress is created that directs traffic destined for the endpoint host to the associated Bowtie Service.
By default, the Chart also creates a ConfigMap that configures ingress-nginx to route inbound UDP 443 traffic to Bowtie using its UDP routing feature.
This feature can be disabled with the indicated value in the Chart’s values.yaml file.
Kubernetes VPN Traffic
If you are not using ingress-nginx, you should disable inbound UDP routing and instead reference your Ingress Controller’s documentation to determine how to route inbound UDP traffic over port 443 to the Bowtie server Service.
In a Kubernetes-based deployment, Bowtie does not manage TLS or ACME-provided certificates and defers certificate procurement to the cluster’s running Ingress Controller.
Cloud and Virtual Machine Ports
Inbound
Ensure that you open the following inbound ports from all sources.
Note that exposing port tcp:80 – normally used for unencrypted HTTP – is optional depending on your operational preference:
You may elect to open port
tcp:80for typical HTTP to HTTPS redirect behavior when TLS is available and to leverage http-01 ACME validation if you provision certificates dynamically.Alternatively, you may leave
tcp:80closed entirely to minimize risk of plaintext over the wire and reduce attack surface on your network perimeter. Whilehttp-01ACME validation will be unavailable, you can still acquire dynamic certificates via tls-alpn-01 validation without any changes – the selection betweenhttp-01andtls-alpn-1is automatic.
Provisioning ACME certificates
ACME certificates are provisioned automatically using Caddy’s automatic HTTPS capabilities.
Caddy will strive to acquire certificates through whatever means are available, whether http-01 or tls-alpn-01 validation, and try multiple ACME providers (Let’s Encrypt and ZeroSSL).
Bear in mind the following:
Let’s Encrypt enforces rate limits. If you are iterating rapidly with proof-of-concept Controllers or a large number of Controllers, you may want to ensure that your number of new Controller certificates does not impact your domain’s rate limits.
If Caddy falls back to ZeroSSL whether due to Let’s Encrypt rate-limiting or service availability, be aware that ZeroSSL does not support the
tls-alpn-01ACME validation protocol, and you will need to expose:80to the Controller if you would like to acquire certificates automatically.
Providing your own certificates is an alternative method if you would like to avoid using ACME to acquire certificates.
The list of required ports is:
tcp:443ortcp:80,443(see the above bullet points)udp:443
Usage:
TCP:80is used for redirects and for acquiring certificates viahttp-01ACME validation.TCP:443is used for the Bowtie controller’s web interface, public HTTPS and websocket connections, andtls-alpn-01ACME validation.UDP:443is used for the Bowtie controller and client’s Wireguard and QUIC protocol traffic.
Optional ports are:
TCP:911is used for Controller SoS. This port does not need to be open at all times and can be exposed ad-hoc if you are engaged in troubleshooting at a later time. Note that this port grants anonymous access to Controller SoS and so you may wish to restrict access to this port to trusted networks only. Opening the port to public access does not present an inherent security risk and anonymous requests can only either begin the validation process to generate a bundle or generate bundles after an administrator has confirmed a validation token.
Outbound
Bowtie Controllers initiate the following outbound network connections which must be open:
UDP:443These ports should be open between Controllers but are not required to other networks such as the public Internet.
TCP:80,443/UDP:53These ports must be open to the public-facing Internet so that the Controller can acquire TLS certificates via the Let’s Encrypt ACME protocol if you are not managing certificates manually and receive updates from Bowtie. Updates are primarily to ensure that Controllers are kept up-to-date – see Updating Controllers for additional information.
These ports are also used when Controllers emit telemetry payloads destined for Bowtie’s telemetry APIs.
Summary
Inbound
TCP:443andUDP:443
Outbound
TCP:80,443andUDP:53,443
All connections
RELATED,ESTABLISHEDOptional
Port
TCP:80if you’d like typical web application HTTPS redirection behavior andhttp-01ACME validation. Note that you can elect to enable Strict Transport Security to aid in pointing client browsers directly at the TLS listener endpoint.Port
TCP:22if you’d like the option tosshinto your Controller (and havesshkeys present through a mechanism like cloud-init)Port
TCP:911to leverage the Controller SoS feature. You may open this port at a later time if you need to perform diagnostics after initial setup; it does not need to be open at all times to support Controller SoS capabilities.
Seeding Configuration
Kubernetes Seeding
On platforms like Kubernetes, consult your provider to determine how best to inject cloud-init data.
Several crucial pieces of the controller setup process – such as TLS and Single Sign-On – can be performed either following the creation of a new controller appliance or loaded beforehand during the bootstrap process. Any static network addresses should also be set at this installation stage.
The combination of cloud-init and some specific configuration files can launch a Controller without any manual intervention necessary to bootstrap its setup.
For a condensed version of how to achieve this, consult the Terraform example code, which provides a complete sample of provisioning an AWS instance with the cloud-init data requisite for an unattended/automated installation.
You can optionally populate the file at /etc/restore to leverage Backup Restore if you would instead prefer to rebuild a Controller from an old backup snapshot.
The remainder of this section lays out the potential options to pre-seed various options and settings that comprise an automatic deployment.
AWS SSM
Bowtie Amazon AMIs ship with AWS Systems Manager Agent (SSM Agent) enabled if you need to leverage SSM capabilities after system launch. Refer to this section for additional information.
If you prefer to launch a controller image without seeding initial configuration data, proceed to Installation. Note that you will need to retrieve an authentication key as noted in Setup Key from the serial console before accessing the Controller Initial Setup page.
If you prefer to launch a controller with configuration set at boot time, you may elect to populate cloud-init data for specific files:
Configure your Controller’s endpoint by populating its hostname using the cloud-init hostname module. This informs your appliance of its final destination endpoint. For example, if you intend to operate your controller at
https://bowtie.net.example.com, you would enter this value into your cloud-init user data:#cloud-config fqdn: bowtie.net.example.com hostname: bowtie.net.example.com preserve_hostname: false prefer_fqdn_over_hostname: true
These settings will ensure that your Controller’s fully-qualified domain name (FQDN) is written out to
/etc/hostnameand used as Bowtie’s network endpoint for mechanisms such as server discovery and ACME certificate provisioning if you are not providing your own certificate files.Automatic Hostname TLS
If you choose to automatically bootstrap your Controller’s hostname and certificate, please ensure that the desired hostname that you enter into cloud-init has been directed at your Controller’s public IP address to ensure that it can properly obtain a TLS certificate. For environments like EC2, you may elect to provision a elastic IP address to associate with the DNS hostname and attach to your EC2 instance at launch time, which ensures that the DNS record is preemptively directed at your new instance. Failure to do so may result in your Controller failing to setup TLS properly.
If you would like to bypass the initial guided setup wizard for a completely automated installation, create the file
/var/lib/bowtie/skip-gui-initwhich will instruct Bowtie to skip the initial setup screen. For example, thewrite_filescloud-init directive can achieve this:#cloud-config write_files: - path: /var/lib/bowtie/skip-gui-init
You can also choose to pre-configure the initial administrative user at this stage. To do so, create a file at
/var/lib/bowtie/init-userswith a newline-separated list of users. Users defined in this way will be granted administrative roles. The following example shell session demonstrates how to generate the requisite lines to insert into theinit-usersfile:username=me@example.com password=$(openssl rand -hex 16) hash=$(echo -n $password | argon2 $(uuidgen) -i -t 3 -p 1 -m 12 -e) echo $username:$hash
Retain the
$passwordvariable to use when logging in after initial startup.Insert the contents of the final
echocommand into theinit-usersfile with cloud-init (replace this example value with your own)#cloud-config write_files: - path: /var/lib/bowtie/init-users content: | me@example.com:$argon2i$v=19$m=4096,t=3,p=1$Y2JhZmQ1ZWYtMTAyNC00NDAxLWFlNWMtMjJlMjYwNWM4OTY5$P/tqTpNHVtAjB3zQizSftOdJiTEi3PpVTcVdCx5/eVQ
If you would like to provide your own certificate files for the Controller’s endpoint, place your certificate file at the path
/etc/ssl/controller.pemand the corresponding key file at/etc/ssl/controller-key.pem. When the Controller bootstraps its initial configuration, it will detect and load these files to serve over its HTTPS endpoint.
All
.yamlfiles present in/etc/dex/will be processed to configure single sign-on. Any connector noted on this page is supported. Each file in this directory should contain a singleconnectorfrom the associated Dex documentation.SSO Access
Please take special care to restrict access to a specific group when configuring SSO. Failure to do so may mean that any user able to authenticate with any Google, GitLab, or other provider will be granted access to your private controller administrative interface.
For example, the following
yamlfile could be used to configure a connector for GitLab which gates access only for members of thebowtienetgroup. The$DEX_ORIGINvariable is provided as a convenience and will ultimately expand to the destination endpoint of your controller.id: gitlab name: GitLab type: gitlab config: clientID: <your client ID> clientSecret: <your client secret> redirectURI: $DEX_ORIGIN/dex/callback useLoginAsID: false groups: - bowtienet
Remember to configure the new Controller’s HTTPS endpoint as a trusted callback in your SSO provider of choice, or authorization flows may not function properly. See Single Sign-On for additional information about how to use these YAML files and Dex to configure single sign-on.
If your networking topology requires that a Controller be given a statically-assigned IP address, you should configure this value at boot time using cloud-init’s networking capabilities. Please note that network configuration can not be controlled via user data and should be defined via other data sources. Refer to the cloud-init documentation section about network configuration sources for additional information about your specific environment.
For example, the LXD documentation for cloud-init network configuration provides the following illustrative snippet:
config: cloud-init.network-config: | version: 1 config: - type: physical name: eth1 subnets: - type: static ipv4: true address: 10.10.101.20 netmask: 255.255.255.0 gateway: 10.10.101.1 control: auto - type: nameserver address: 10.10.10.254
Reference the cloud-init networking documentation for a list of all available options.
See Controller Networking for documentation regarding networking configuration changes after first boot.
Reverse proxy settings outlined in Web Configuration can be set at this time. For example, to raise Rate Limiting to 500 requests per remote IP per 20 seconds and to set Strict Transport Security to one month, include the following cloud-init directive:
#cloud-config write_files: - path: /etc/default/caddy content: | RATELIMIT="500" HSTS="max-age=10800"
You should configure a consistent site ID for co-located Controllers by defining the
SITE_IDenvironment variable in a file within/etc/bowtie-service.d/which populates environment variables for thebowtie-serverservice. The following example YAML configures this:#cloud-config write_files: - path: /etc/bowtie-server.d/site-id.conf content: | # Change this to a value unique to your environment. # You can generate UUID4 strings with the uuidgen command-line utility SITE_ID=11111111-2222-3333-4444-555555555555
If you would like to configure additional users, cloud-init supports provisioning users via the users option. For example, this configuration snippet adds additional trusted ssh keys for the
rootuser:#cloud-config users: - name: root ssh_authorized_keys: - ssh-ed25519 <replace with your pubkey> myuser lock_passwd: true
To cluster or peer Controllers into a highly-available setup as outlined in Multi-Controller Setup, two values should be set: the
should-join.conffile and theBOWTIE_SYNC_PSKenvironment variable.should-join.confinstructs the Controller to peer with the other Controller indicated in the configuration file, andBOWTIE_SYNC_PSKestablishes a trusted key to authenticate the Controllers against each other. These two values can be configured with the following example cloud-init YAML:#cloud-config write_files: # Uniform value consistent across the entire cluster of Controlers. - path: /etc/bowtie-server.d/psk.conf content: | BOWTIE_SYNC_PSK=<your sync PSK> # This will be consumed by the bowtie-server service at start-up. - path: /var/lib/bowtie/should-join.conf content: | entrypoint = "https://your-first-controller.example.com"
Consult Multi-Controller Setup for complete documentation on these parameters.
You may configure automatic Controller updates at this time. Configure Unattended Updates with a file like the following, which instructs the Controller to update hourly:
#cloud-config write_files: - path: /etc/update-at content: | [Timer] OnCalendar= OnCalendar=hourly
Automatic updates may instead be configured in the web interface later if desired.
Putting these settings together, you could, for example, launch an EC2 instance with this user-data that would configure the above settings (leaving aside any static networking configuration, which cannot be controlled via user-data):
Example Values
Note that these are example values. Please use your own configuration values that apply to your environment.
#cloud-config

fqdn: bowtie.net.example.com
hostname: bowtie.net.example.com
preserve_hostname: false
prefer_fqdn_over_hostname: true
write_files:
- path: /etc/default/caddy
content: |
RATELIMIT="500"
HSTS="max-age=10800"
- path: /etc/ssl/controller.pem
content: |
-----BEGIN CERTIFICATE-----
MIIEB......................<truncated>...................xgSng==
-----END CERTIFICATE-----
- path: /etc/ssl/controller-key.pem
content: |
-----BEGIN PRIVATE KEY-----
MIIEvb.....................<truncated>.........pVkglLcnghNN3suU=
-----END PRIVATE KEY-----
- path: /etc/dex/gitlab.yaml
content: |
id: gitlab
name: GitLab
type: gitlab
config:
  clientID: <your client ID>
  clientSecret: <your client secret>
  redirectURI: $DEX_ORIGIN/dex/callback
  useLoginAsID: false
  groups:
  - bowtienet
- path: /etc/bowtie-server.d/custom.conf
content: |
SITE_ID=11111111-2222-3333-4444-555555555555
BOWTIE_SYNC_PSK=<your sync PSK>
- path: /var/lib/bowtie/skip-gui-init
- path: /var/lib/bowtie/should-join.conf
content: |
entrypoint = "https://your-first-controller.example.com"
- path: /etc/update-at
content: |
[Timer]
OnCalendar=
OnCalendar=hourly
users:
- name: root
ssh_authorized_keys:
- ssh-ed25519 <replace with your pubkey> myuser
lock_passwd: true
Seeding Configuration
Both the controller endpoint and the SSO configuration files may be set independently, concurrently (as in this example), or left unset to be configured later in Configuration.
Once your controller completes its automatic bootstrapping process, you may access your controller at its HTTPS endpoint. In this example, that endpoint would be https://bowtie.net.example.com. To proceed to use this method, continue to Installation, amending the launch process with any applicable user-data for your platform of choice.
For additional documentation about settings and configuration options available on Controllers, see Controller Operation as well as the Bowtie Controllers page.
The Bowtie Server section outlines options configurable in environment variable files in /etc/bowtie-server.d/* that can be set at this time as well.
cloud-init Caveats
Bear in mind the following when leveraging cloud-init modules and features:
Many login shell executable paths that you may reference for modules such as user provisioning may not be at their normal paths like
/bin/bash. You can instead find login shells under/run/current-system/sw/bin/, such as/run/current-system/sw/bin/bashforbashand/run/current-system/sw/bin/zshforzsh.sudorules may be subject to the configuration management changes on Controllers and may not persist across updates or changes. If a non-root user should havesudoprivileges, add them to thewheelgroup, which hassudoaccess.
Installation
Two types of Controller installations are supported: either cloud or virtual-machine based or on Kubernetes.
Cloud or Virtual Machine Installation
One or more Controllers will coordinate membership on your Bowtie network, access policies, and more. At least one Controller is necessary for Clients to use as their network entry point, but we suggesting running more than one for high availability. If you’re just getting started, proving out your network topology with one Controller to begin with is perfectly fine.
cloud-init
All Bowtie Controller appliance images ship with cloud-init configured and available for use. Note that, due to the nature of the controller image as an appliance, not all features of cloud-init are available for use. We recommend using an associated cloud-init user data script primarily for Seeding Configuration for automated provisioning or provisioning ssh keys so that you may access running appliances in case a need arises for system-level access for debugging purposes.
Note that leveraging cloud-init is optional and not required during the Controller setup process, but installing ssh keys now can ease debugging steps later.
In particular, performing low-level maintenance as outlined in System Configuration that requires ssh access requires pre-loaded keys.
We provide appliance images to deploy in your environment.
These are self-contained virtual machine or container images that bundle everything necessary for a functional Bowtie Controller either as an operating system disk or OCI-compliant container.
Choose the image suitable for your environment: AWS, GCE, Proxmox, qcow2 (for run-times like qemu and KVM), Xen, VMWare, or Hyper-V:
If you manage your environment with Terraform and would like to deploy a Controller in the same way, consult the Terraform section.
Cloud Disk Images
If you operate in one of these cloud providers within a region that lacks a suitable cloud image to create new instances from, raw disk image files are provided for each that can be imported manually. To download these disk image files, see the pages AWS disks, Azure disks, or GCP disks and click on the link to see all packages for the platform, which will list all downloadable disk image files instead of cloud image resource IDs.
Note that if you install Controllers using this method, you may rely on Updating Controllers to update Controllers in-place from their original disk image version without needing to create images manually for each new version.
Download compression
Most images are provided in compressed .gz (gzip) format and may be decompressed with gunzip <filename> or gzip -d <filename> prior to use in their respective virtualization runtime.
Some platforms such as GCE will accept system images in compressed form and do not require decompression before use.
AWS
Bowtie controller appliances are provided as AMIs in several regions including AWS GovCloud. We also provide raw disk images suitable for deployment into restricted environments – follow the instructions for Raw AMI Image Import for this approach. The following instructions continue using the native AMI ID method.
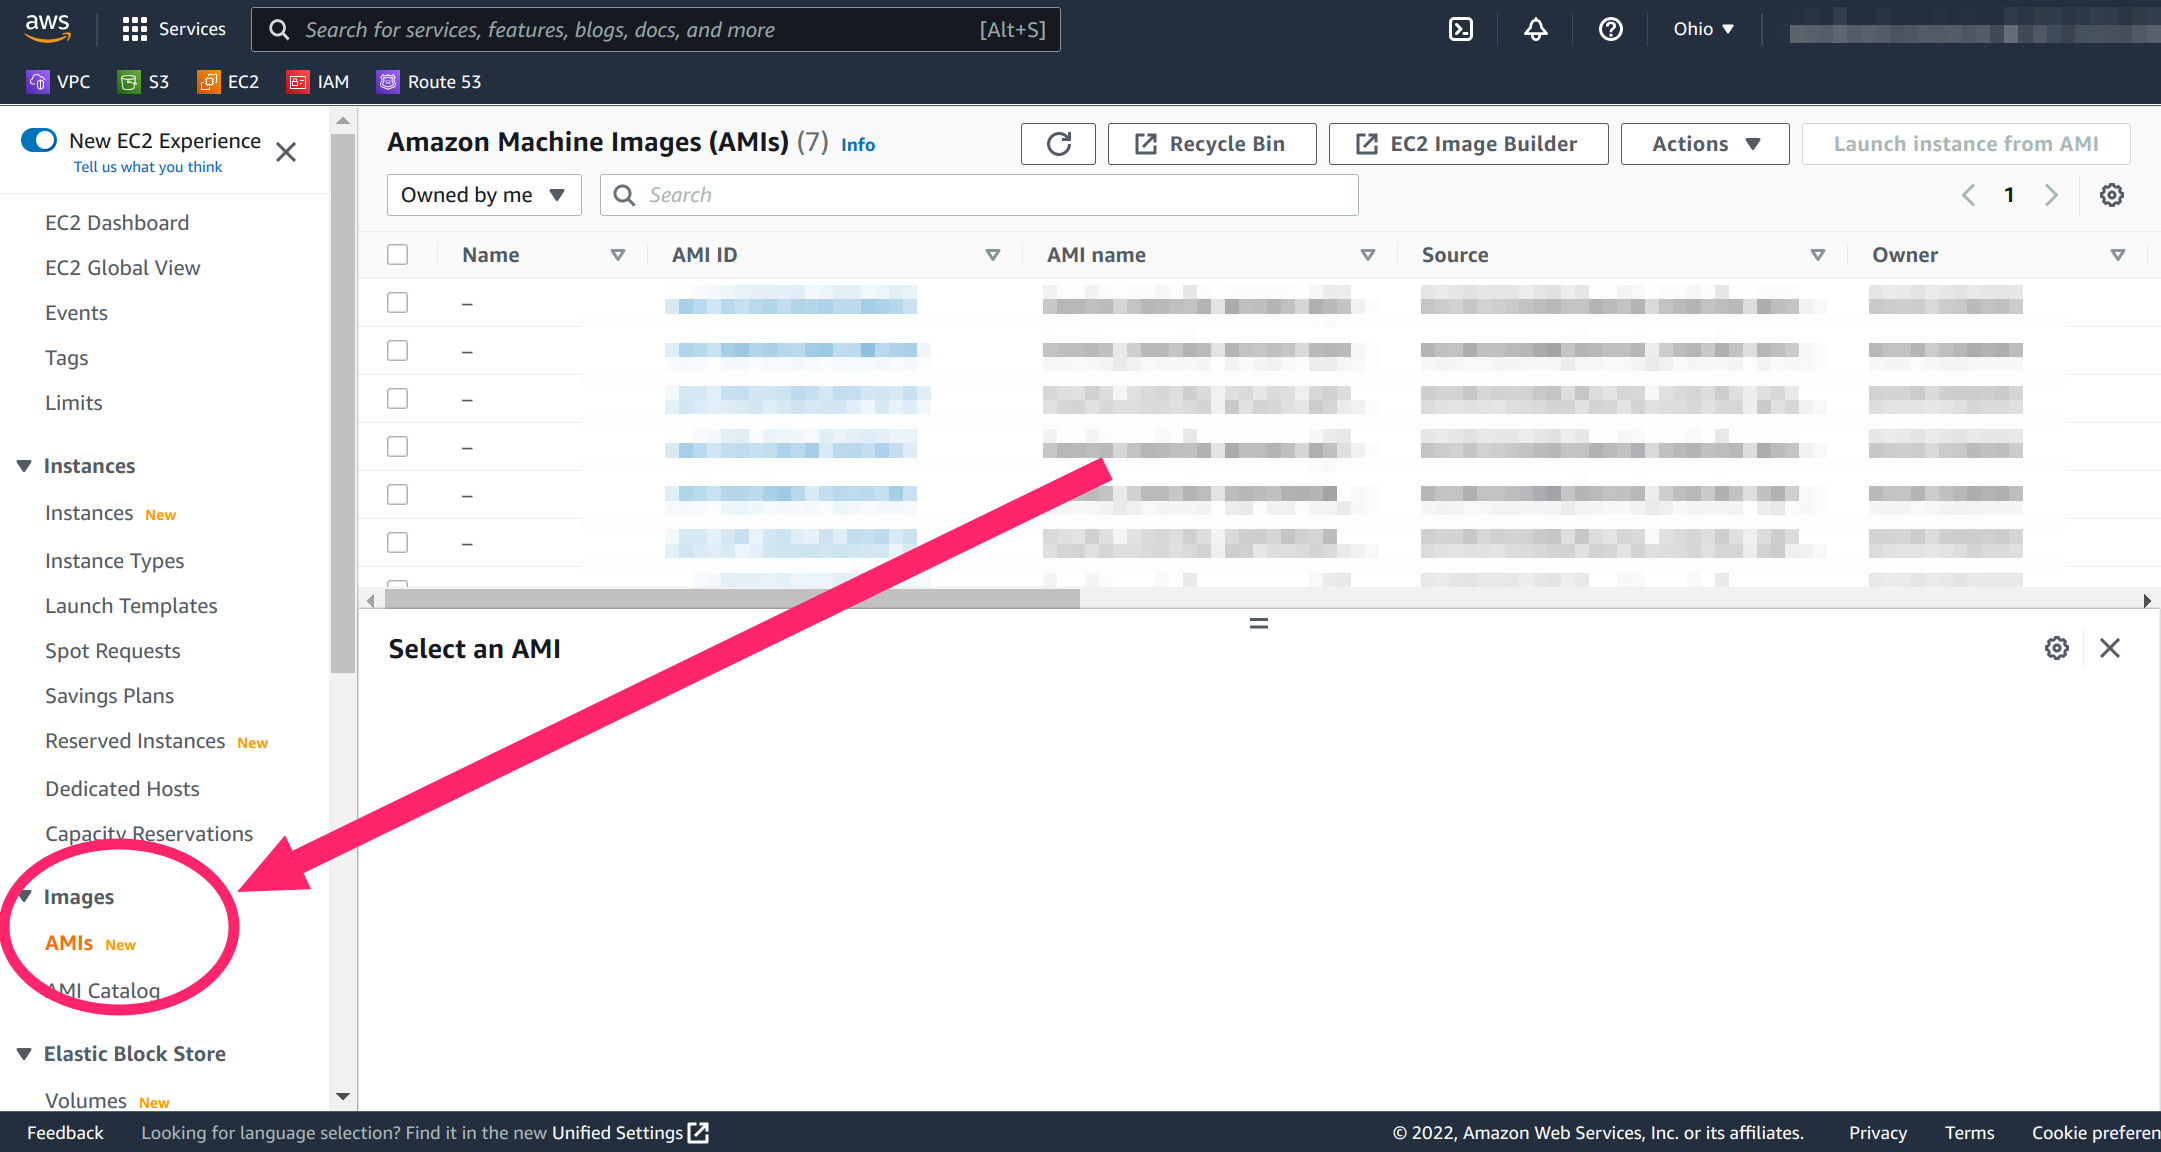
Select the “AMIs” menu item from the EC2 sidebar under the “Images” menu:
Select “Public images” from the AMIs menu, then search for images owned by account 055761336000 (the AWS account ID for Bowtie). If deploying within an AWS GovCloud region, use the Bowtie AWS account ID 055769116956.
Bowtie maintains one latest AMI at any given time, so you should be presented with one choice.
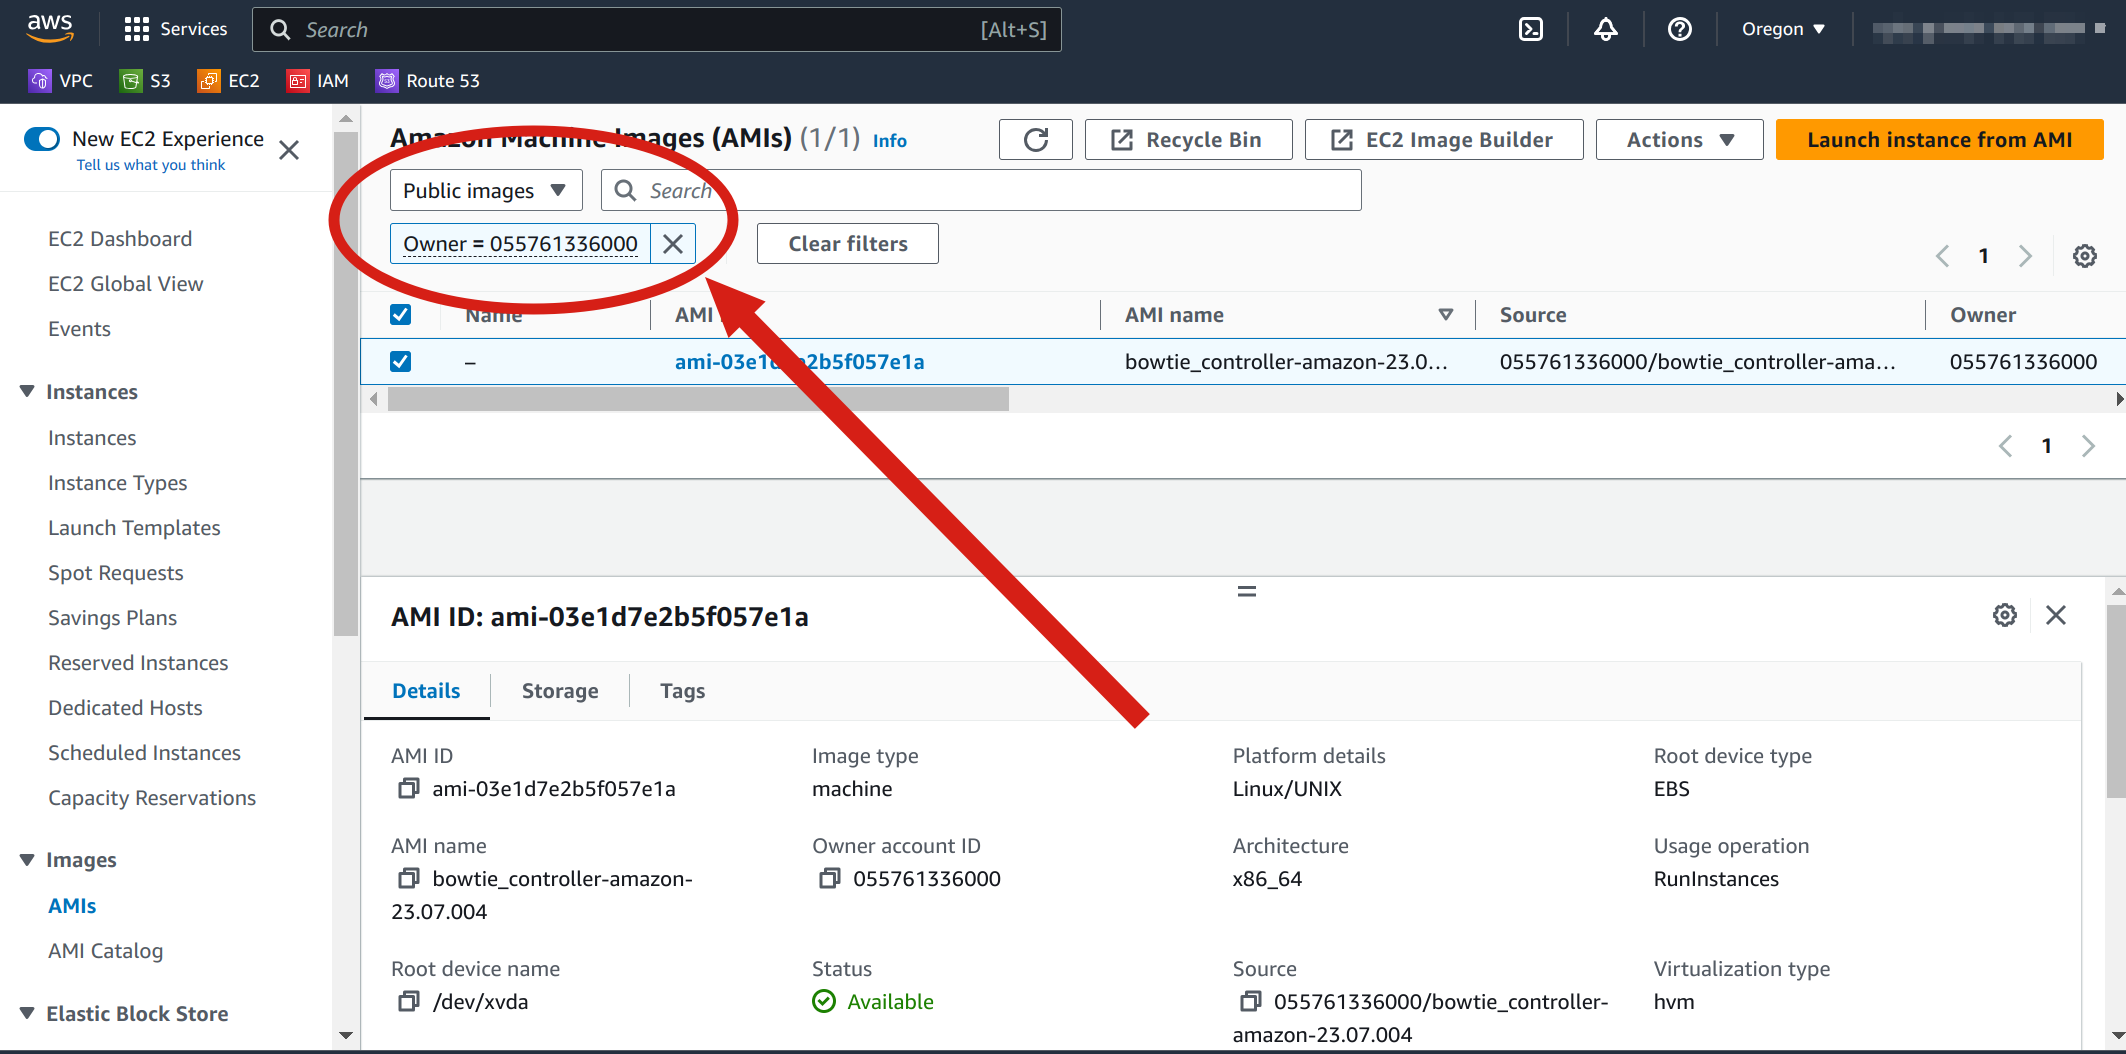
Finally, select “Launch instance from AMI” to perform any requisite configuration steps to launch an instance from the AMI in your EC2 environment.
Many different settings are presented when launching an EC2 instance – if you’re a network administrator, then you may already have pre-existing security groups and private networks that satisfy the criteria outlined in Pre-flight Checks. In general, use the following guidance when selecting from the options presented on the “Launch instance” page:
Instance size should be suitably large to avoid under-powered performance – we suggest, at a minimum, no fewer than 2 cores and no less than 4GB of memory.
Network communication must be open between each Bowtie controller and Bowtie clients installed on edge network devices like employee workstations. At a minimum:
Open the ports indicated under Open Port Requirements
Ensure your Controller is installed on a subnet that has access to the Internet and can reach any private resources you intend to make accessible over your private Bowtie network
Remember to allocate a public network address for the instance
Optionally populate the “User data” field if you elect to use Seeding Configuration
AWS images are bundled with AWS Systems Manager Agent (SSM Agent) for convenience. You may leverage any of the capabilities of SSM Agent for your Controller such as ssh access. Remember to launch your instance with an appropriate instance profile if you elect to use this capability.
Once the instance has launched successfully, proceed to Configuration.
Raw AMI Image Import
In some cases, you may wish to import raw .vhd files directly such as when deploying into restricted environments or regions.
To do so, you will download the associated .vhd file built for AWS and import it as a new snapshot and then register an AMI from that restored snapshot.
Navigate to the meta control plane downloads page for Amazon package artifacts and download the disk image.
Once you have the raw image file, check the download’s sha256 checksum against the value listed on the meta control plane download page to verify the file integrity:
sha256sum *.vhd
Upload this .vhd file into an S3 bucket within the same account that you would like to create a new AMI within.
Once the S3 object is ready, you may proceed to follow the AWS documentation to import a disk as a snapshot which will create a new snapshot in your account based upon the contents of the .vhd file in S3.
When defining your containers.json file, use the vhd format as the disk image format.
After the snapshot has been prepared, continue to create a Linux AMI from a snapshot based upon the official AWS documentation. Use the following values as appropriate when configuring the import command from either the console or the AWS CLI:
Architecture:
x86_64Root device name:
/dev/xvdaBoot mode:
legacy-biosVirtualization type:
hvmSR IOV net support:
simpleENA support:
trueAdditional block device mappings:
DeviceName=/dev/sdb,VirtualName=ephemeral0DeviceName=/dev/sdc,VirtualName=ephemeral1DeviceName=/dev/sdd,VirtualName=ephemeral2DeviceName=/dev/sde,VirtualName=ephemeral3
Once your AMI has finished creating, follow the original steps to create an instance from an AWS AMI using the new AMI ID.
Azure
Controller images are provided as community-shared Azure Compute Gallery Images in the Azure public cloud as well as Azure GovCloud.
Azure GovCloud
Azure GovCloud images cannot be shared as a Community Gallery and so need to be shared with individual tenants. If your Controller should be deployed into an Azure GovCloud region, please reach out to a Bowtie representative who will provide you with the necessary app registration information to access GovCloud Controller images.
Alternatively, you may refer to Azure Disk Image Import if you are unable to create new instances from shared images and wish to import raw disk images instead. The following steps demonstrate how to use the former (shared images):
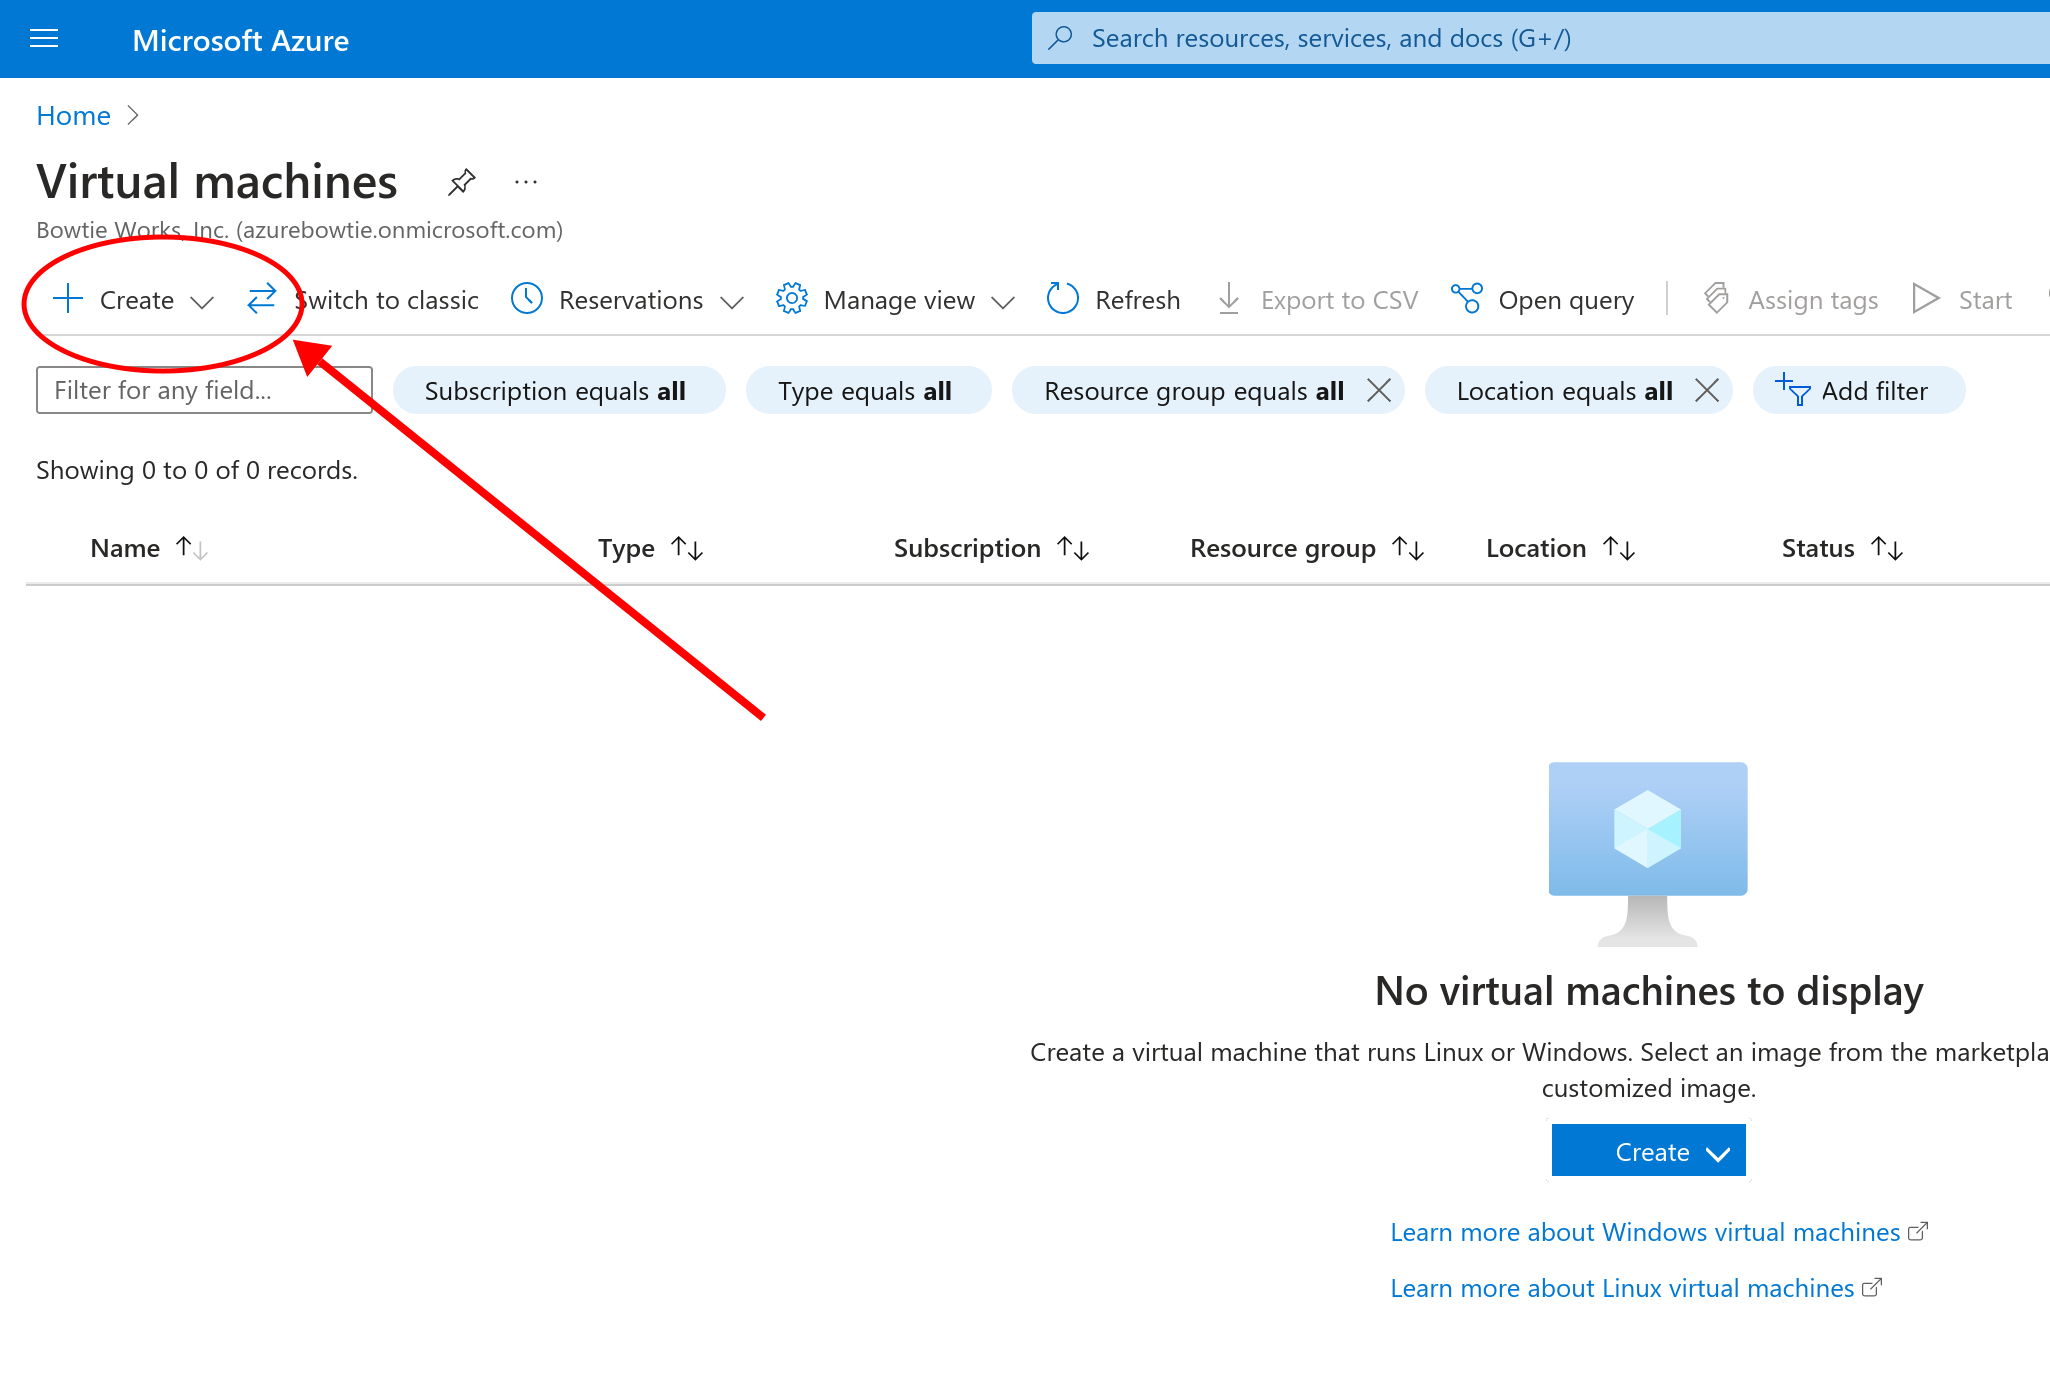
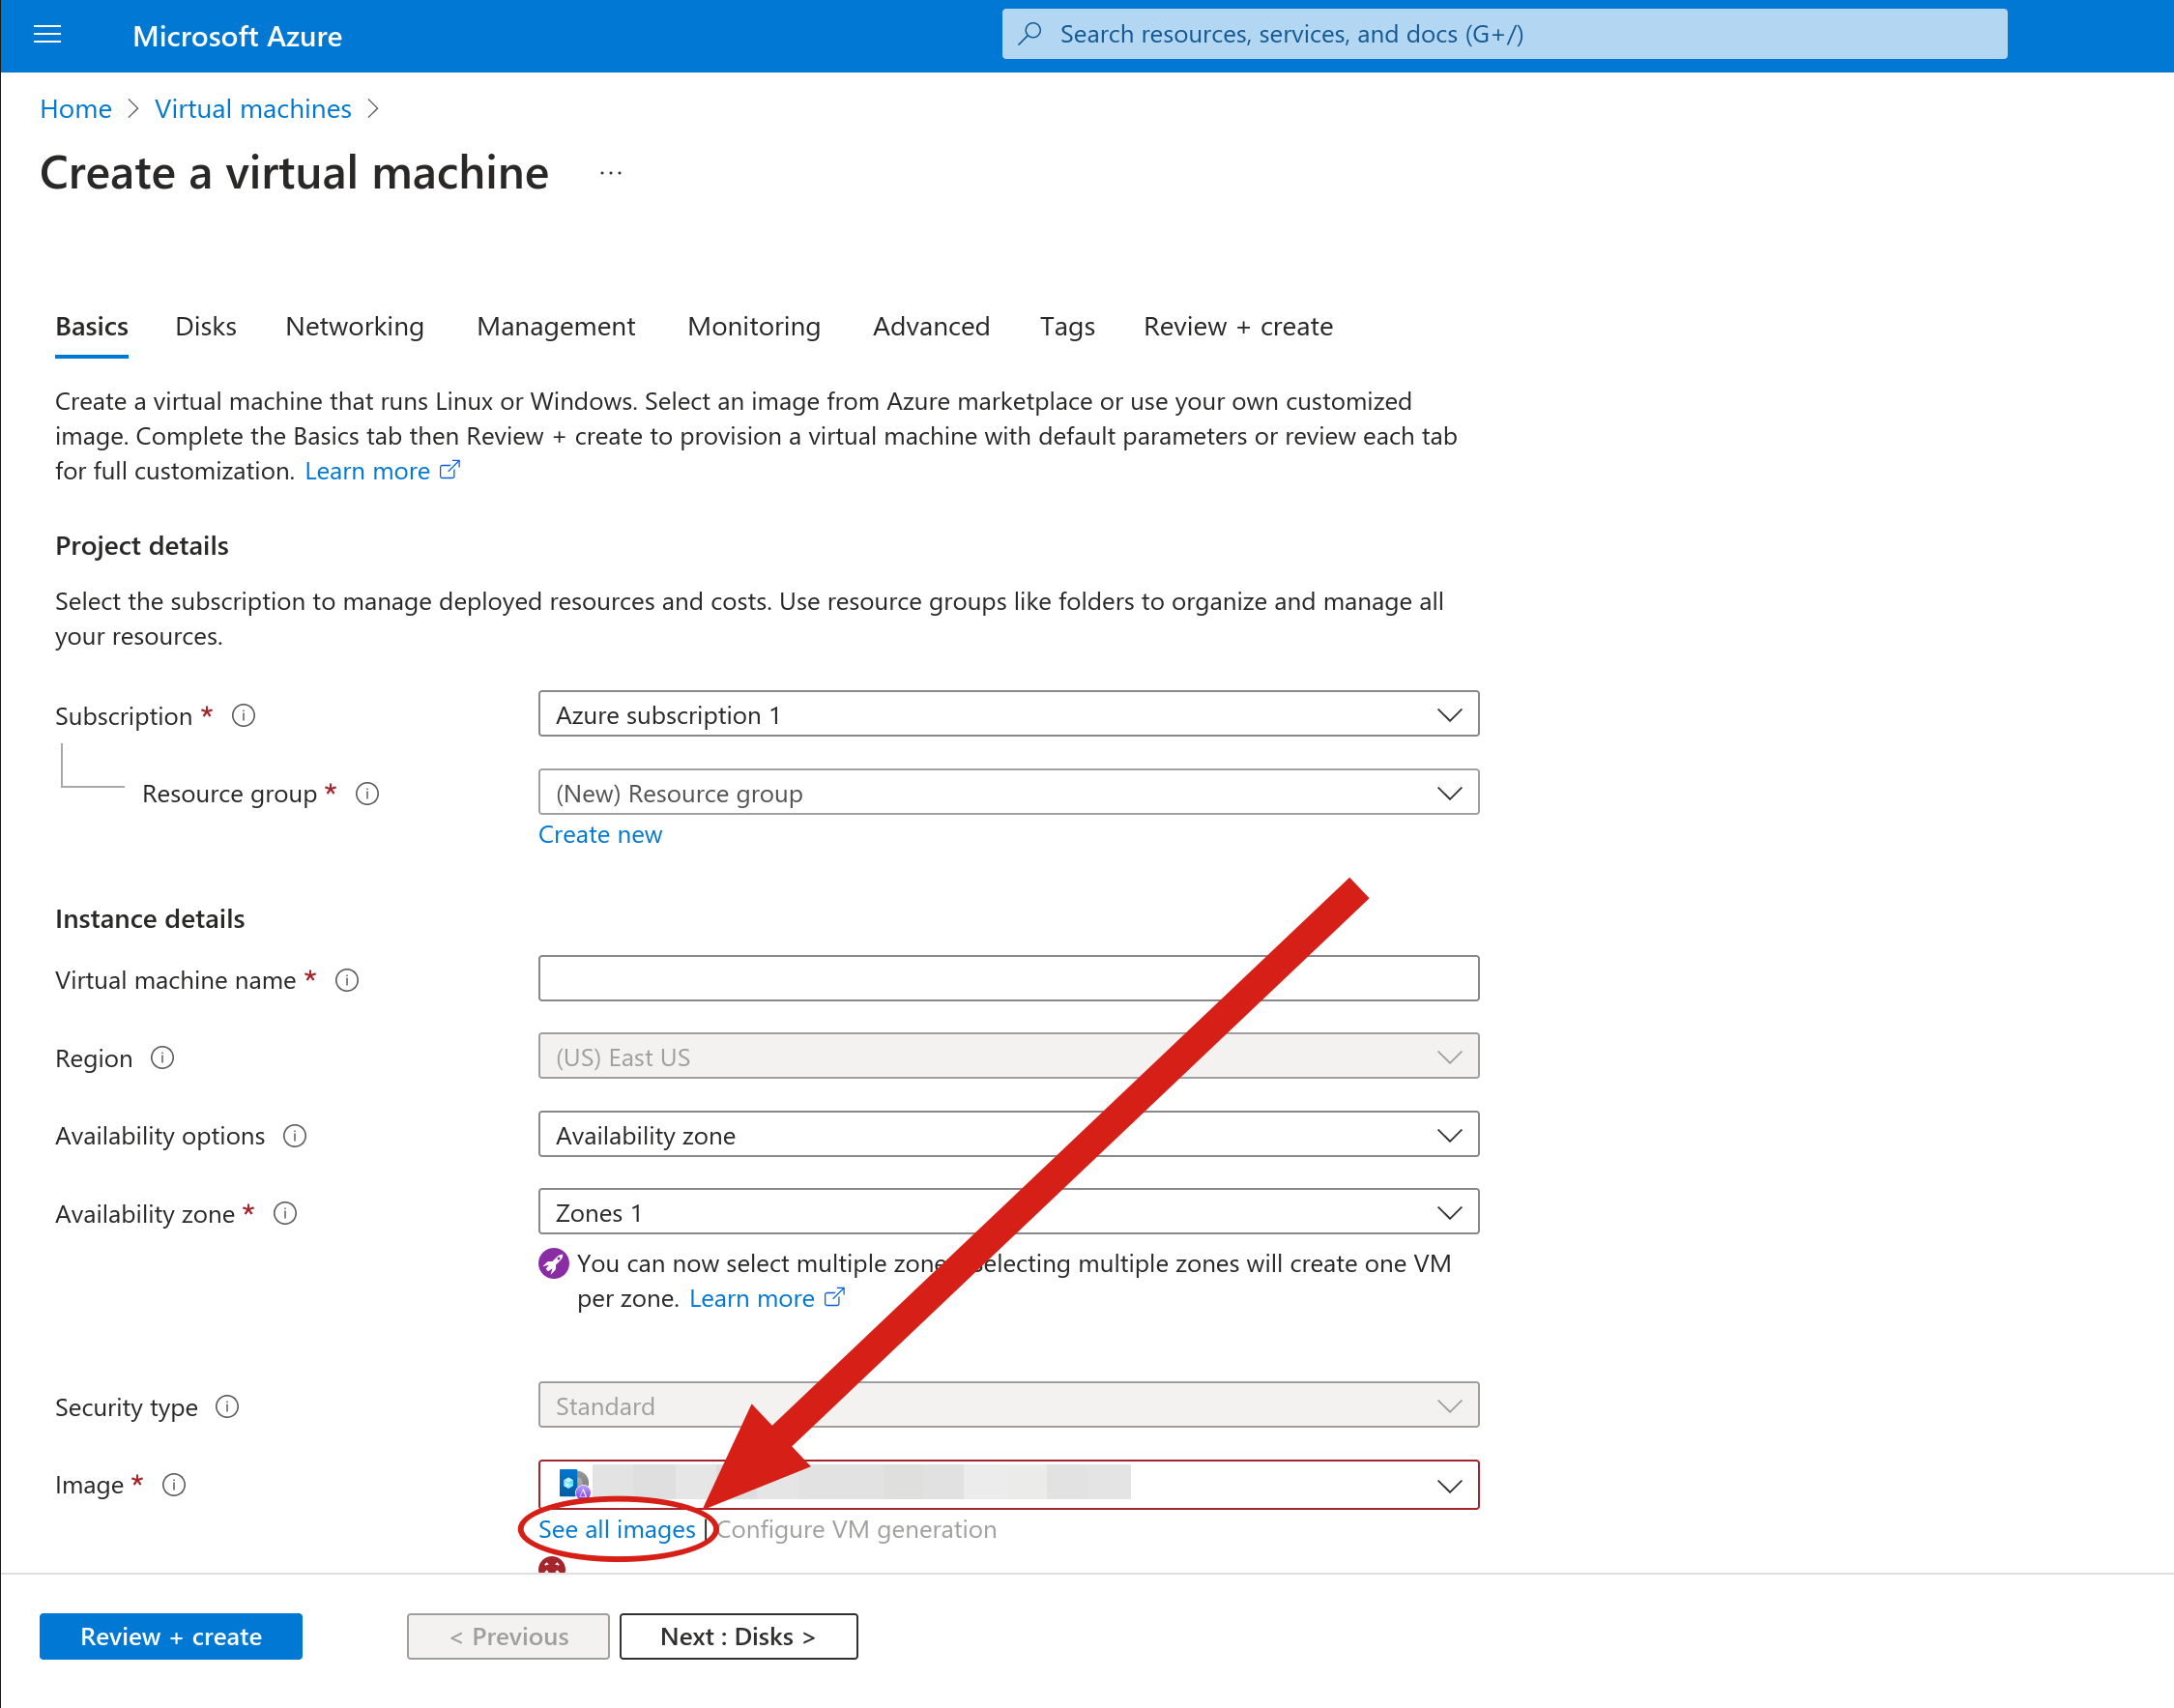
To provision a new Controller, launch a new virtual machine using the latest Gallery image. To begin, start the process to create a new virtual machine:
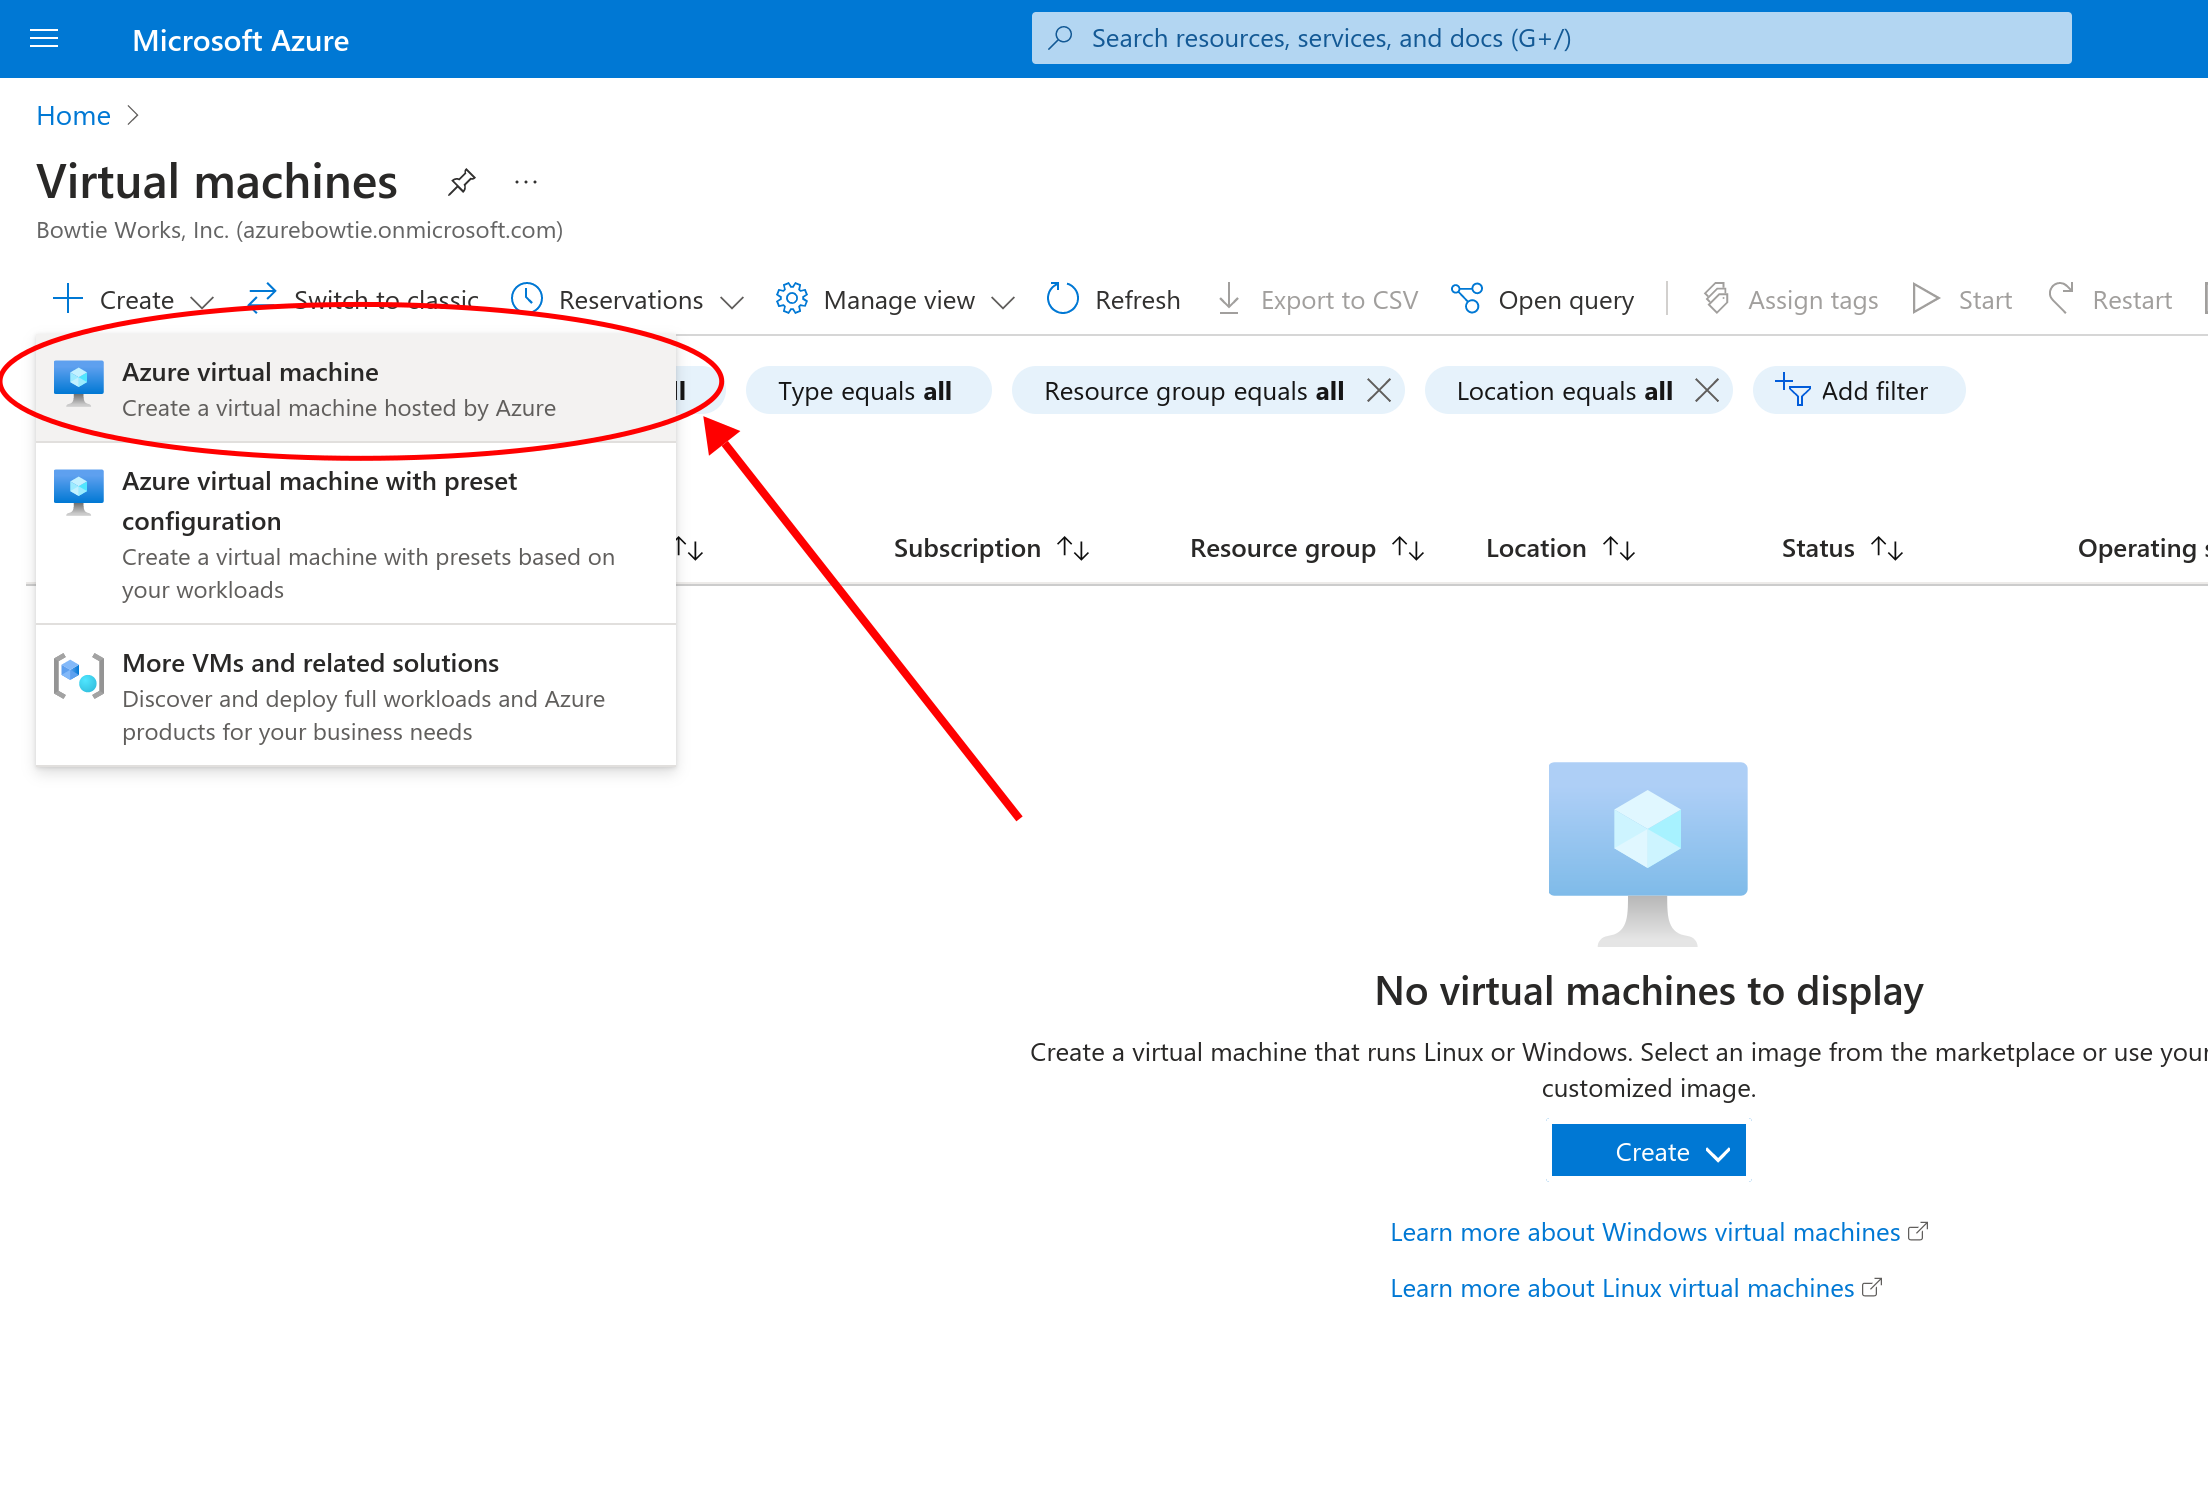
Select “Azure Virtual Machine” to proceed to the virtual machine configuration setup screen:
From this page under the “Image” section, select “See all images” to be taken to the image selection screen for Marketplace and community images.
From this page, select “Community Images” under “Other Items”

Use the filters for community images to find the latest Bowtie Controller image.
Click “Image Name” and enter controller and click “Public gallery name” to enter bowtie to filter down the available candidates.
The selection interface will display the latest Controller image available for all published regions.
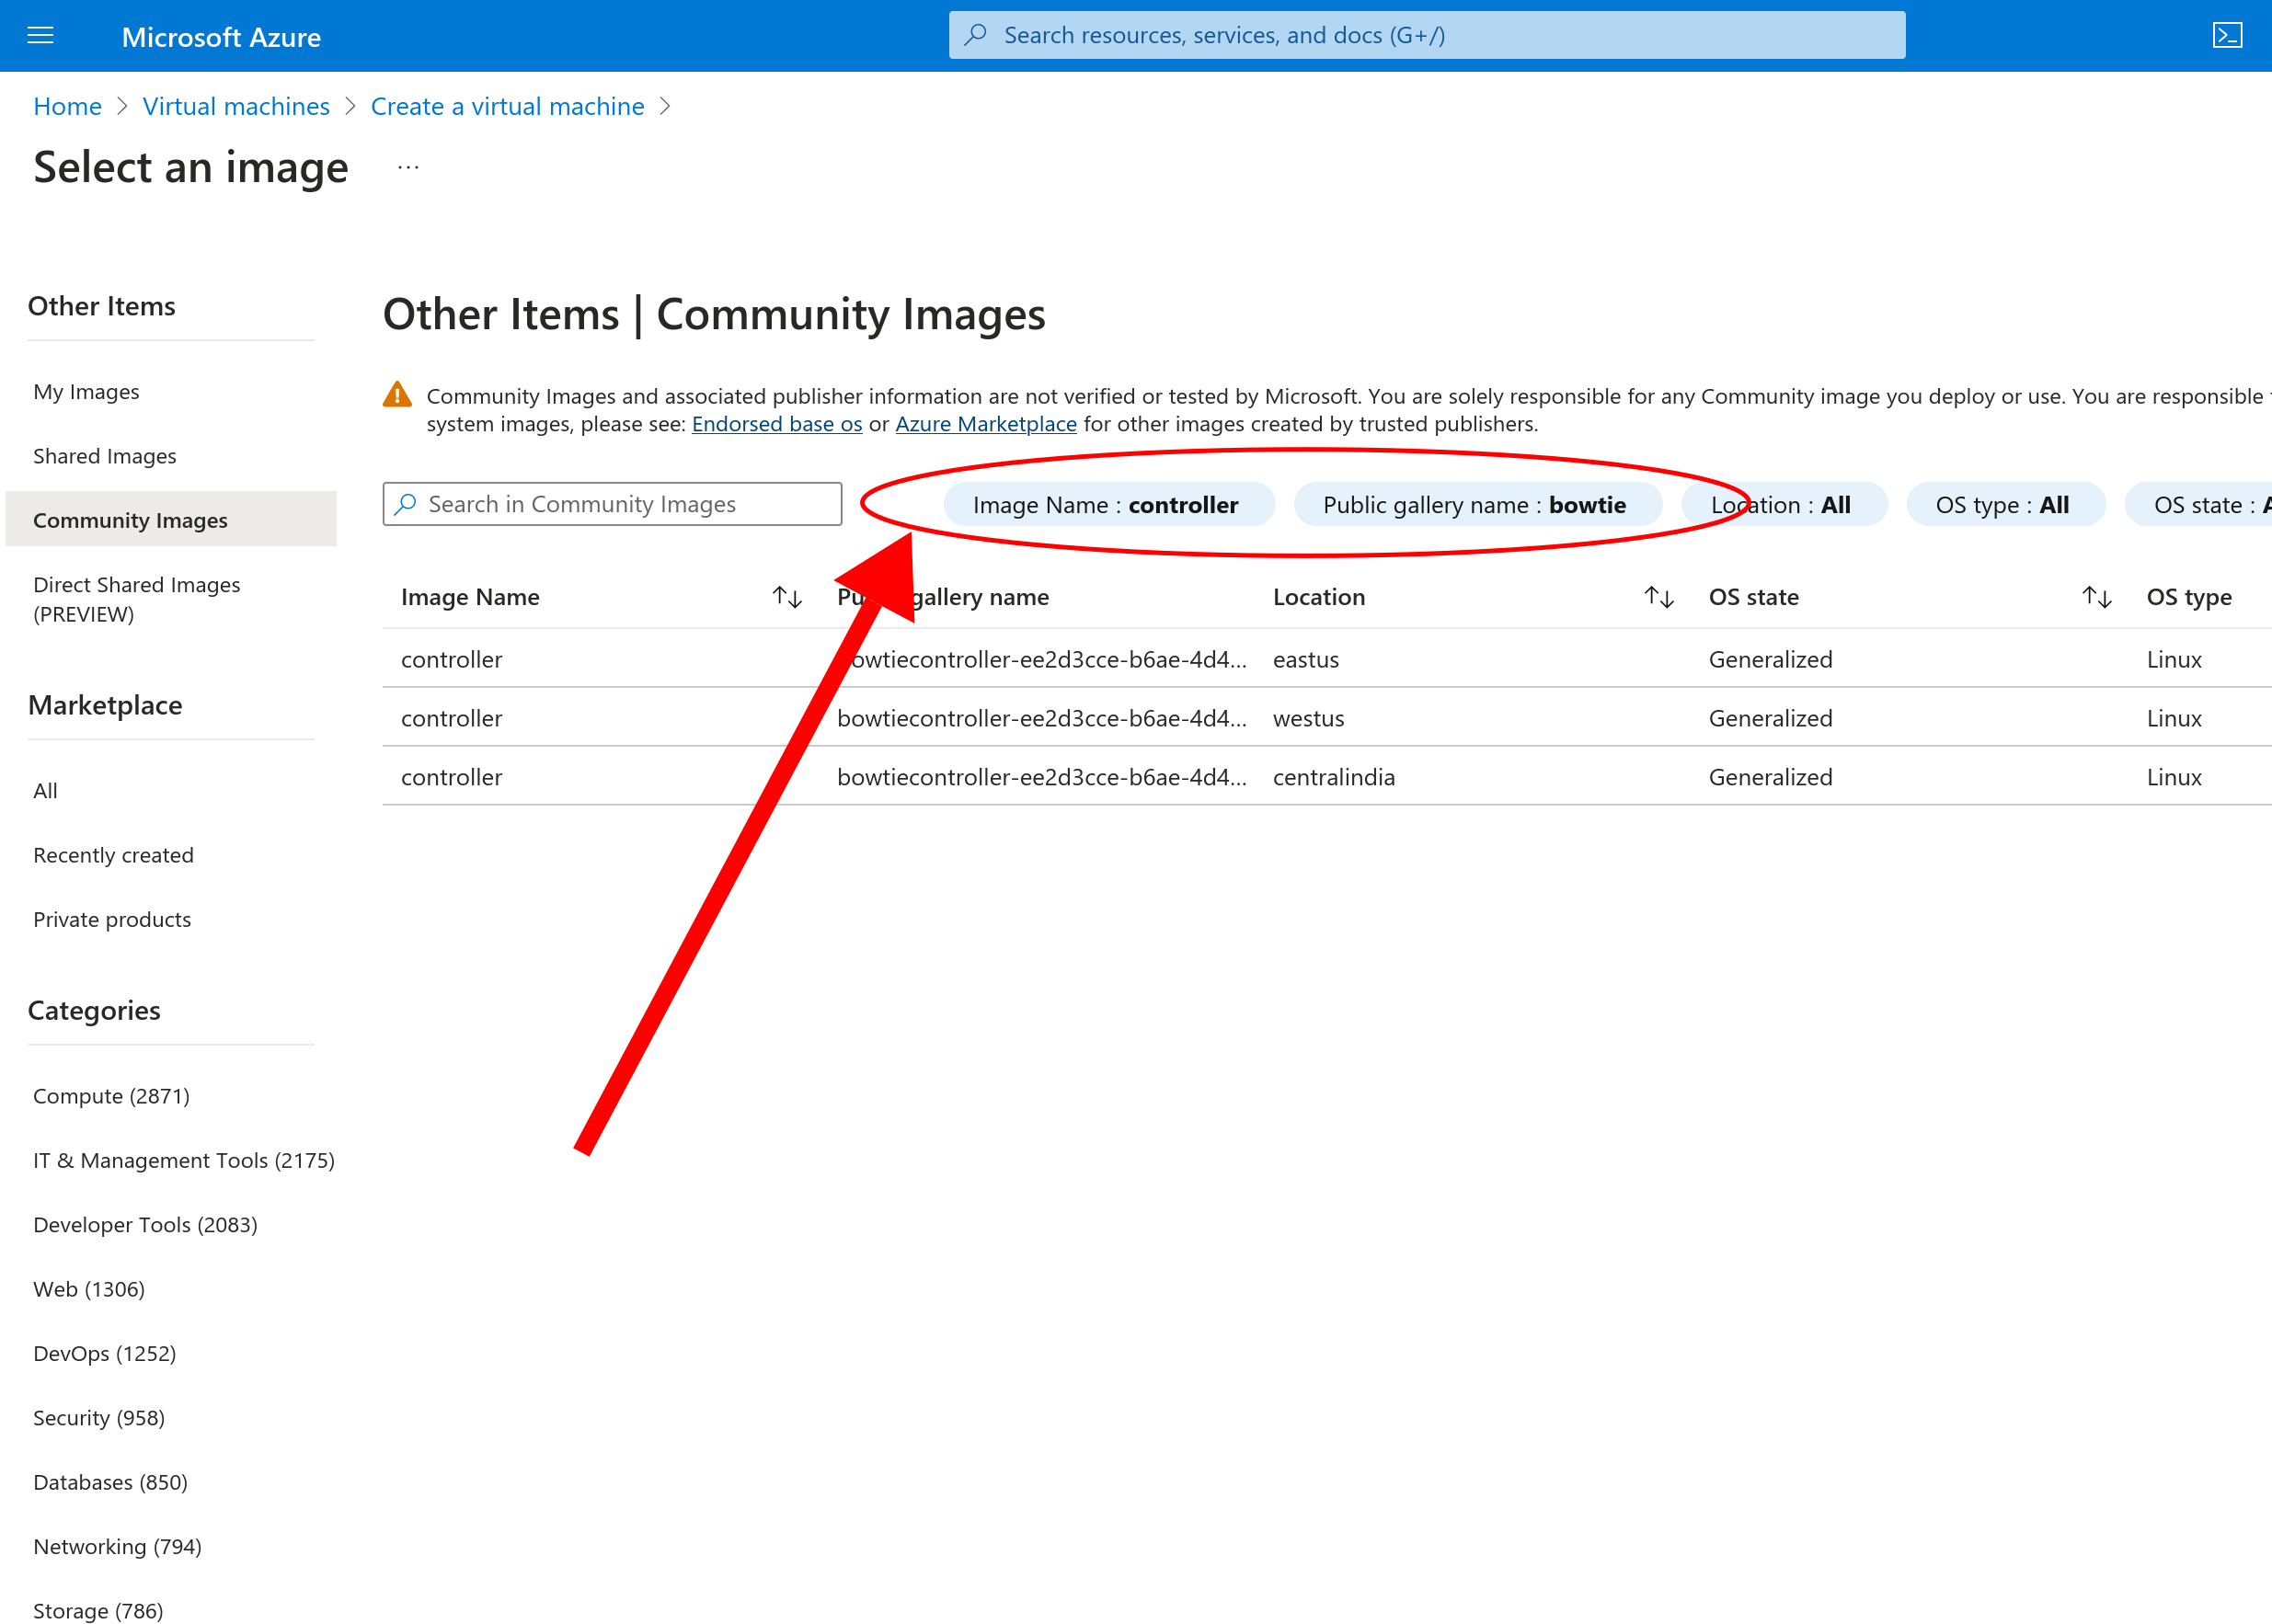
Community Gallery ID
To fully-qualify the community gallery name to avoid any possibility of ambiguity when selecting a gallery image, you may filter for gallery name bowtiecontroller-ee2d3cce-b6ae-4d47-a93b-b88591ea9108.
All gallery images should originate from the Bowtie Works, Inc. tenant ID 9f6fcbb0-a706-4c3d-bf31-52ee2ee6273c.
Select the controller image for your desired region to proceed.
After choosing the gallery image, continue with the VM configuration process. Please refer to the controller requirements section when configuring machine resources and network controls such as inbound port access.
Bear in mind the following when deploying a Bowtie Controller into Azure:
The native Azure Linux provisioning daemon, WALinuxAgent, runs on Controller appliances in Azure to conform to Azure’s expectation that Virtual Machines check-in with operational events such as the completion of the boot-up process. However, Bowtie Controllers rely on the provisioning capabilities of cloud-init to configure resources like files and hostname, so fields used for provisioning such as the username field and public SSH key will not be provisioned by
WALinuxAgent, which will defer provisioning tocloud-init. If you would like to create users or load an initialsshkey onto the host, please rely on cloud-init rather than the username and ssh public key fields when building your Virtual Machine (oraz vmflags like--ssh-key-valuesor--generate-ssh-keys).Due to the limited scope of the Bowtie Controller as a network appliance, many WALinuxAgent extensions may not function as expected. We suggest logging into the appliance via
sshkeys populated with cloud-init if a host requires debugging.We currently publish into a limited set of regions during this preview stage but can readily publish into new regions if you operate within a region without images available. Please reach out to a representative if you require images in a new region.
The normal cloud-init Caveats apply.
After you have configured and launched the Controller appliance, proceed to Configuration.
Azure Disk Image Import
For environments that may not have access to Bowtie Controller images, you may instead download the raw .vhd disk image files which are suitable for importing as new images that can be used to create new Bowtie Controller images.
Navigate to the package download page for Azure to find a listing of all downloadable disk image files compatible with Azure. After downloading the latest version, confirm the file’s integrity by comparing its checksum against the checksum listed on the download page:
sha256sum *.vhd
Upload this validated .vhd file as a storage blob into a storage account container that you intend to restore the image from.
Once it has completed uploading, navigate to the Images section of the Azure console:
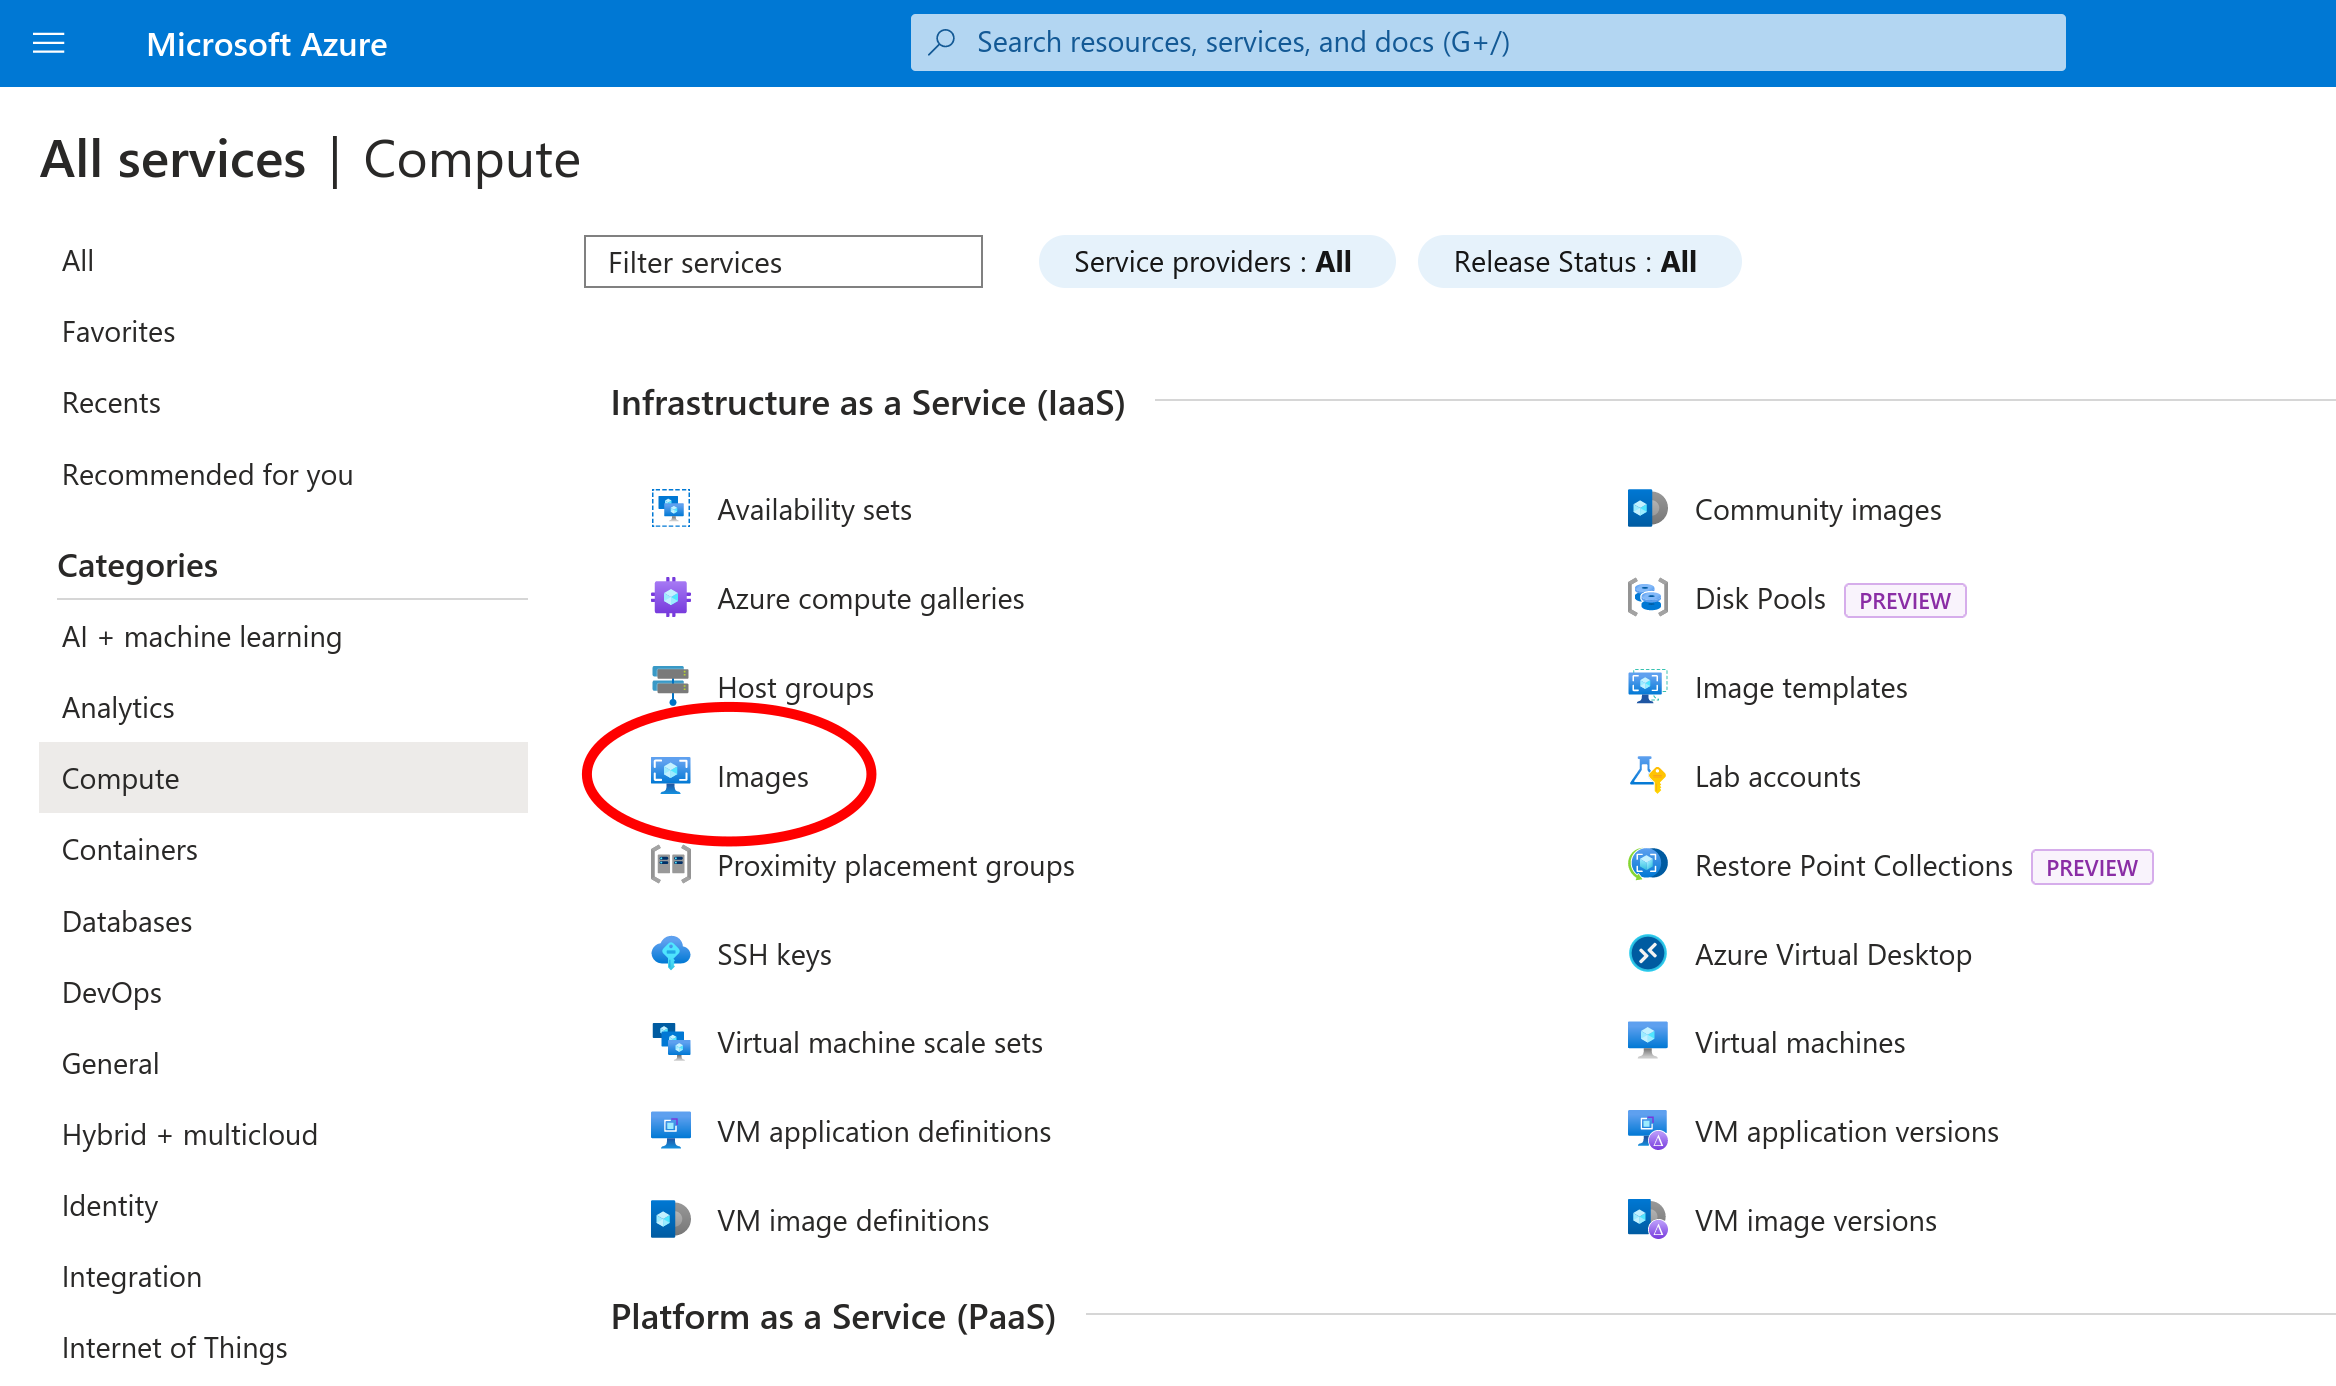
Select “Create” on the top menu to create a new image:
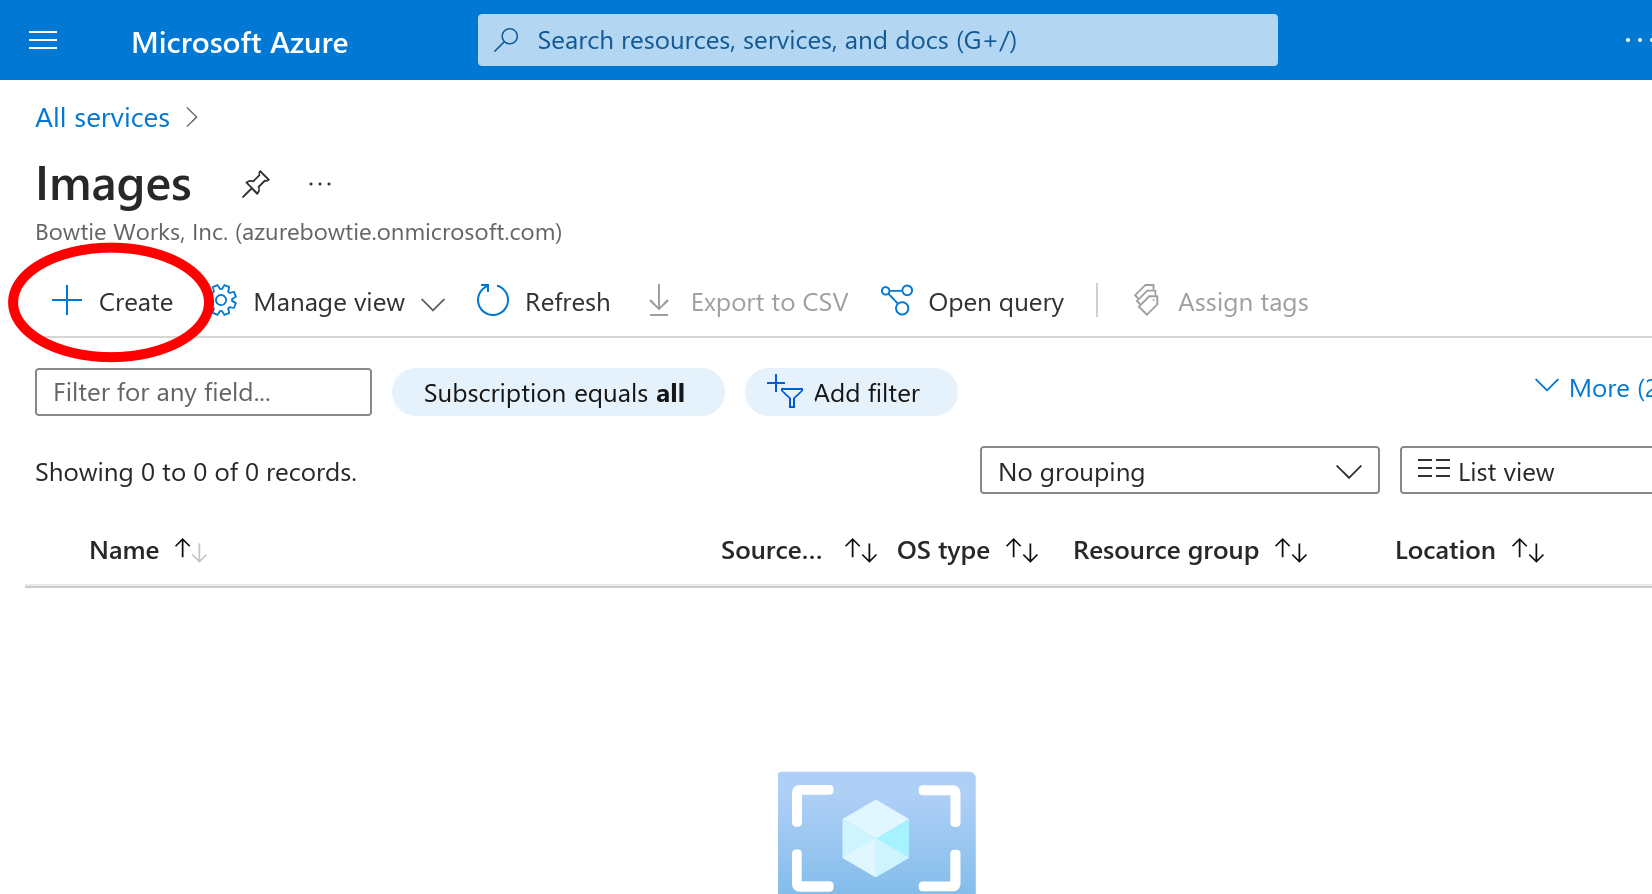
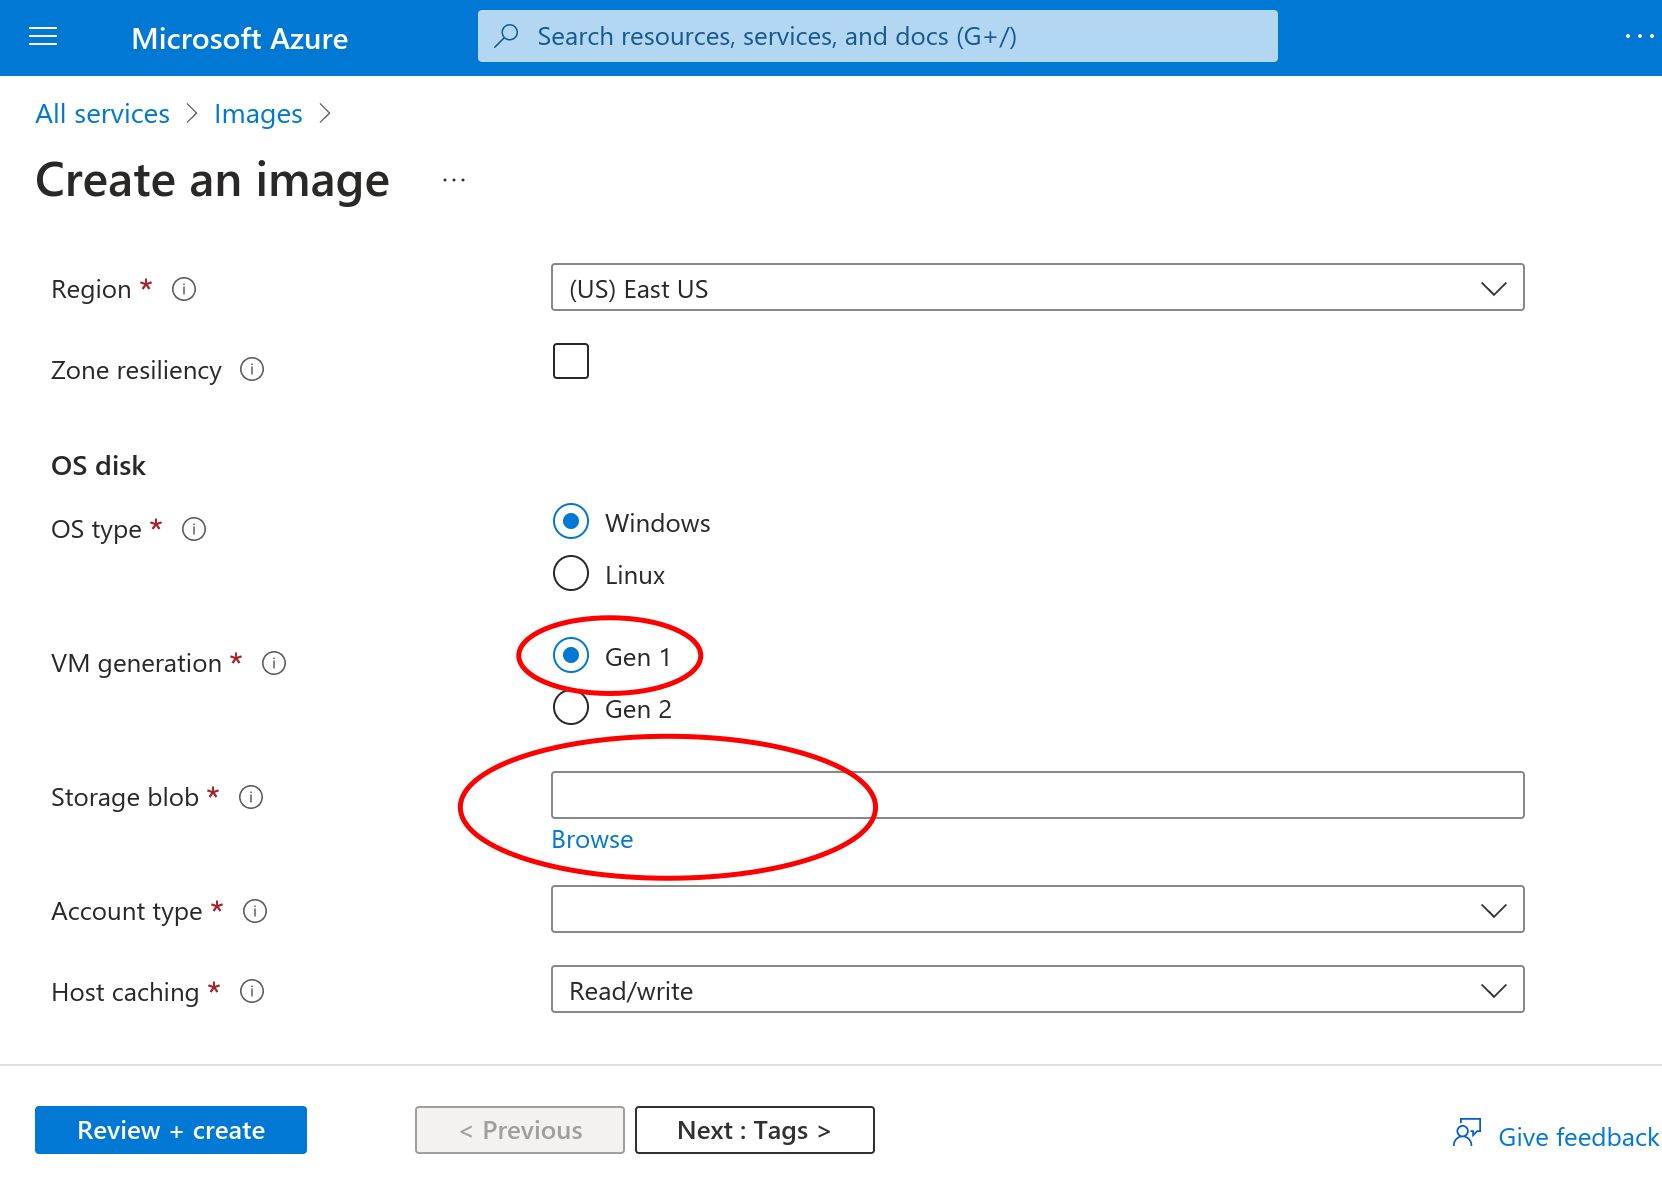
Fill out the relevant fields for your deployment like instance Name, and
under the “OS Disk” section, choose the following settings:
OS type:
LinuxVM generation:
Gen 1Storage blob
Select
Browseand navigate to the.vhdpreviously uploaded to your storage container and select it.
Once you are satisfied with your new image’s settings, proceed to “Review + Create”. After the image creation process finishes, you may follow the steps outlined in the Azure setup and substitute your custom image name instead of choosing “See all images” at that step.
GCE
Publicly-available Google Compute Engine images are published for use from the bowtie GCP project.
Because GCP does not list public images, you will need to acquire the image resource ID to launch a new instance based upon this custom image.
The meta control plane downloads page for GCP lists these image IDs.
To deploy within the GCP console directly, follow the GCE Disk Image Import instructions below to import the image and then create your instance. If opting to use the gcloud CLI, pass the image=projects/bowtie-works/global/images/$ID parameter when defining disks in order to create an instance based on the publicly-available Controller image.
For example:
gcloud compute instances create $your_instance_name \
  <...other parameters...> \
  image=projects/bowtie-works/global/images/$bowtie_controller_name
Reference Controller System Requirements when choosing options like instance size and network access controls. Proceed to Configuration once instance creation completes.
GCE Disk Image Import
Bowtie also provides a Google Cloud Platform disk image that may be imported into your project and used to create new instances in cases where native compute images may not be suitable.
To acquire the disk image, follow the instructions at Bowtie Downloads. You may navigate directly to GCP images by navigating here Once the download has finished, you should have a local file ending in .raw.tar.gz ready to use with the gcloud command-line tool.
First, complete any necessary steps in order to install and configure the gcloud command-line utility.
Once gcloud has been installed and configured, import the Bowtie controller appliance image in two steps:
First, copy the disk image to GCP GCS. Replace the filename below with the name of the file that you acquired from the download page and
<destination bucket>to a bucket in your GCP project:gcloud alpha storage cp \ bowtie_controller-gce-r@66c7fe9_d@a298975_i@8g369as.raw.tar.gz \ gs://<destination bucket>
Then create a GCE image from the GCS object, replacing the bucket name and object name as necessary for your project’s bucket and uploaded image file. You may choose any name for the image that
gcloudwill create, in this example the desired name isbowtie-controller:gcloud compute images create bowtie-controller \ --source-uri gs://<destination bucket>/<disk object name>
Finally, navigate to the GCE section of the GCP console and select the image with the name you created and create a new GCE instance following the requisite guidelines for Network Requirements, Open Port Requirements, and Seeding Configuration.
Proxmox
Bowtie provides a Proxmox disk image that may be imported into your environment and used to create new virtual machines.
To acquire the disk image, follow the instructions at Bowtie Downloads. Once finished, you should have a local file ending in .vma.zst ready to use with Proxmox.
Remember that cloud-init is available at launch time if you would like to provision any ssh keys for later command-line access using a user-data value.
For example, the following steps will bootstrap a Proxmox environment in preparation to launch a Controller configured via cloud-init.
First, define any relevant cloud-init user-data with desired settings in a file like /var/lib/vz/snippets/user.yaml:
#cloud-config

# Replace these values with your desired hostname endpoint
hostname: controller-beta.net.example.com
fqdn: controller-beta.net.example.com
preserve_hostname: false
prefer_fqdn_over_hostname: true

users:
  - name: root
    ssh_authorized_keys:
      # Replace this with your actual key
      - ssh-ed25519 <key content here> myuser
    lock_passwd: true

write_files:
  # Perform Controller boostrapping without setup wizard
  - path: /var/lib/bowtie/skip-gui-init
  # Configure the server with environment variables
  - path: /etc/bowtie-server.d/custom.conf
    content: |
        # Replace these values with your actual Site ID and pre-shared key.
        SITE_ID=11111111-2222-3333-4444-555555555555
        BOWTIE_SYNC_PSK=<sensitive>
  # Cluster with another Bowtie Controller
  - path: /var/lib/bowtie/should-join.conf
    content: |
        entrypoint="https://controller-alpha.net.example.com"
  # Configure single sign-on
  - path: /etc/dex/sso.yaml
    content: |
        type: oidc
        id: keycloak
        name: Organization SSO
        config:
          issuer: https://auth.example.com/realms/my_organization
          clientID: my_organization
          clientSecret: <insert your client secret here>
          redirectURI: https://controller-beta.net.example.com/dex/callback
If your environment expects statically-configured network addresses, you may configure the Controller as outlined in static networking.
Create the cloud-init YAML in a path like /var/lib/vz/snippets/net.yaml:
version: 2
ethernets:
  en*:
    addresses:
      - 10.100.1.100/16
    gateway4: 10.100.1.1
    nameservers:
      addresses: [10.100.1.53]
Define the local content using pvesm:
pvesm set local --content images,rootdir,vztmpl,backup,iso,snippets
Create a new virtual machine with ID 100 (choose a free ID suitable for your environment):
qmrestore <path to .vma.zst file> 100 --unique
Finally, define the cloud-init data for the new virtual machine:
qm set 100 --sata0 local:cloudinit
qm set 100 --cicustom "network=local:snippets/net.yaml,user=local:snippets/user.yaml"
You may now start the virtual machine which will honor the settings defined in user.yaml and net.yaml.
qcow2
Bowtie provides two variants of qcow2 images: one with a legacy BIOS boot loader and an EFI-based option.
Follow the instructions at Bowtie Downloads to acquire a qcow2 image suitable for use in environments such as KVM and libvirt by using the downloads page. Note that both BIOS-based qcow images are available in conjunction with EFI-based qcow-efi files.
Once downloaded, use the disk image in your hypervisor manager of choice, such as virt-manager or virsh. Once the virtual machine has been created and is running, proceed to Configuration.
Xen
Bowtie Xen images are compatible with hypervisors that rely on Xen as their underlying virtualization technology.
This includes platforms like XCP-ng or vanilla Xen installations.
Images are provided in .ova format.
See the Xen downloads page on the Bowtie downloads page for a list of latest Xen .ova image files.
After downloading the disk image and verifying its checksum to confirm its integrity, import the .ova to create a new Controller instance.
The .ova file includes recommended allocation defaults for resources like CPU count and memory size which you may tune according to Controller System Requirements.
Refer to your platform’s documentation for instructions on how to import disk image .ova files.
Once the virtual machine has been created and is running, proceed to Configuration.
VMWare
Follow the instructions to acquire a VMWare image on the Bowtie Downloads page.
Once you’ve downloaded a .vmdk or .ova file, create a new virtual machine from the image.
Depending on your environment, you may need to choose a specific format:
For workstations, most users should choose a
.vmdkimage to import.For enterprise environments that usually run platforms like ESXi, the
.ovaimage is compatible.
Proceed to Configuration once the virtual machine is running.
Hyper-V
Follow Bowtie Downloads where you can download a file ending with .vhdx suitable for use with Hyper-V.
Once you’ve created a new virtual machine from the .vhdx file, you can proceed to Configuration.
Incus
Incus (and compatible systems like LXD) are supported via unified tarballs that bundle a virtual machine disk images alongside a metadata file.
Creating container instances based on file trees rather than qcow-based disk images is currently unsupported.
See the Incus and LXD downloads page on the Bowtie downloads page for a list of latest Incus tarball files.
Import the unified tarball image with an appropriate import command, such as:
incus image import controller.tar.zst --alias bowtie-controller
After the image is available, proceed to create a virtual machine instance with your deployment’s relevant network settings.
Once the virtual machine has been created and is running, proceed to Configuration.
Kubernetes Installation
Kubernetes Support
Early Bowtie Controller Kubernetes support was added in the form of a Helm chart that relied on custom kernel modules being present on underlying hosts. This method, while baseline functional, lacked feature parity with full appliance-based deployments, and so we have deprecated this installation method pending a new strategy.
If your environment requires Kubernetes support, we suggest considering KubeVirt paired with a Controller build such as qcow2. Future updates to this platform will likely take the form of a Helm chart paired with a KubeVirt virtual machine resource.
Configuration
Once you’ve started one or more Bowtie controllers, it’s time to configure them!
A mature Bowtie installation will include several controllers. In that shape, they should all share a parent domain that is not your organization’s bare domain.
If you are example.com your control plane could be net.example.com and your controllers could be controller1.net.example.com,
controller2.net.example.com, etc. We would like you to start thinking of individual controllers as impermanent and replaceable, so you might even prefer randomized names, or names based on private IPs.
cp-172-0-0-1.net.example.com is a fine name for a controller.
If this is your first controller or a demonstration, any name will do. bowtie-demo.example.com can be sufficient, and it can serve as the primary entry point and the only controller for a while.
Post-setup Configuration
The settings mentioned here apply primarily to initial setup. If you’d like to configure more fine-grained settings like reverse proxy settings or log retention, please refer to Controller Operation.
Setup Key
Browse to your Controller’s public IP address if you haven’t set up a DNS record for the host.
If you’ve configured a DNS record to point at the public IP address of the new Controller, use that hostname instead – either approach is supported.
If you’re deploying on Kubernetes,, navigate to the endpoint that you’ve configured.
Setup HTTPS
Both HTTP and HTTPS listeners are configured during initial setup. If possible, we recommend relying on HTTPS to ensure configuration options remain encrypted.
Because unconfigured Controllers lack valid certificates, a self-signed certificate may be used to terminate HTTPS during initial setup.
The setup instructions emitted on the serial console and bowtie-server.service logs include self-signed certificate fingerprints you may use to validate connection authenticity.
If you provide your own certificates during initial host creation, your Controller will consume and terminate TLS with the certificate and private key you provide for all inbound HTTPS requests. The setup wizard will pre-populate this certificate information for you, but other settings will still need to be configured.
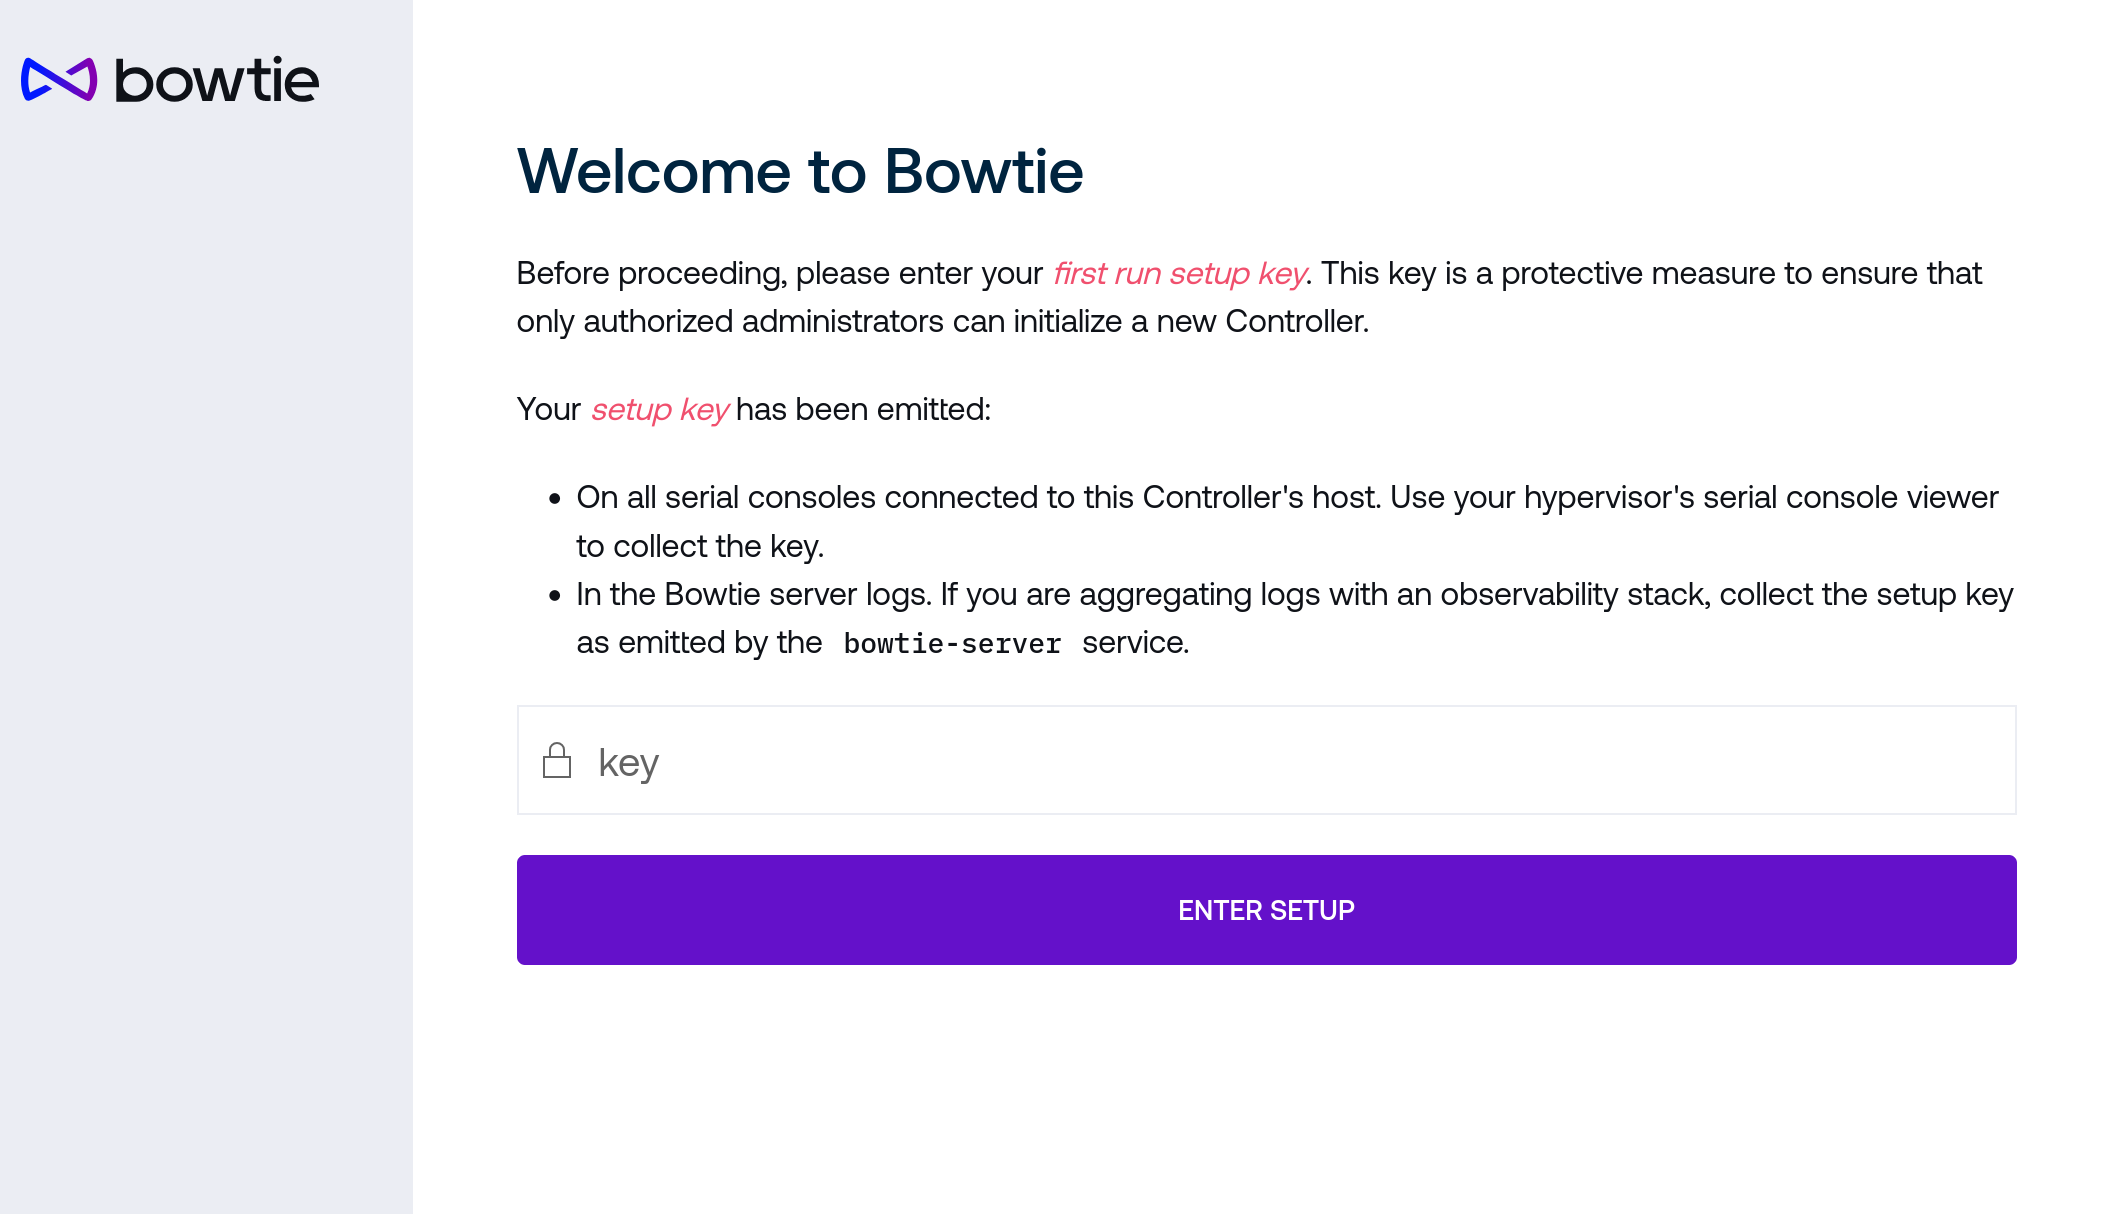
Initial Setup access is protected by authentication to ensure that only authorized administrators can initiate the setup phase. This authentication key is emitted by the Controller over multiple channels accessible only to administrators. After initial boot and periodically afterwards, the setup authentication key is emitted:
On all serial consoles
In
bowtie-server.servicelogs
On most hypervisors or cloud platforms the serial console should be viewable to retrieve the key, which is derived from an English word list in cases where the serial text output may not be easily copied.
After obtaining the setup key, use it to unlock the Initial Setup page:
Authentication will be retained as part of your browser session.
Initial Setup
The initial setup landing page will load:
Use this page to perform initial Controller configuration. Each section of the initial setup page should be self-explanatory, but we include information here for additional clarity.
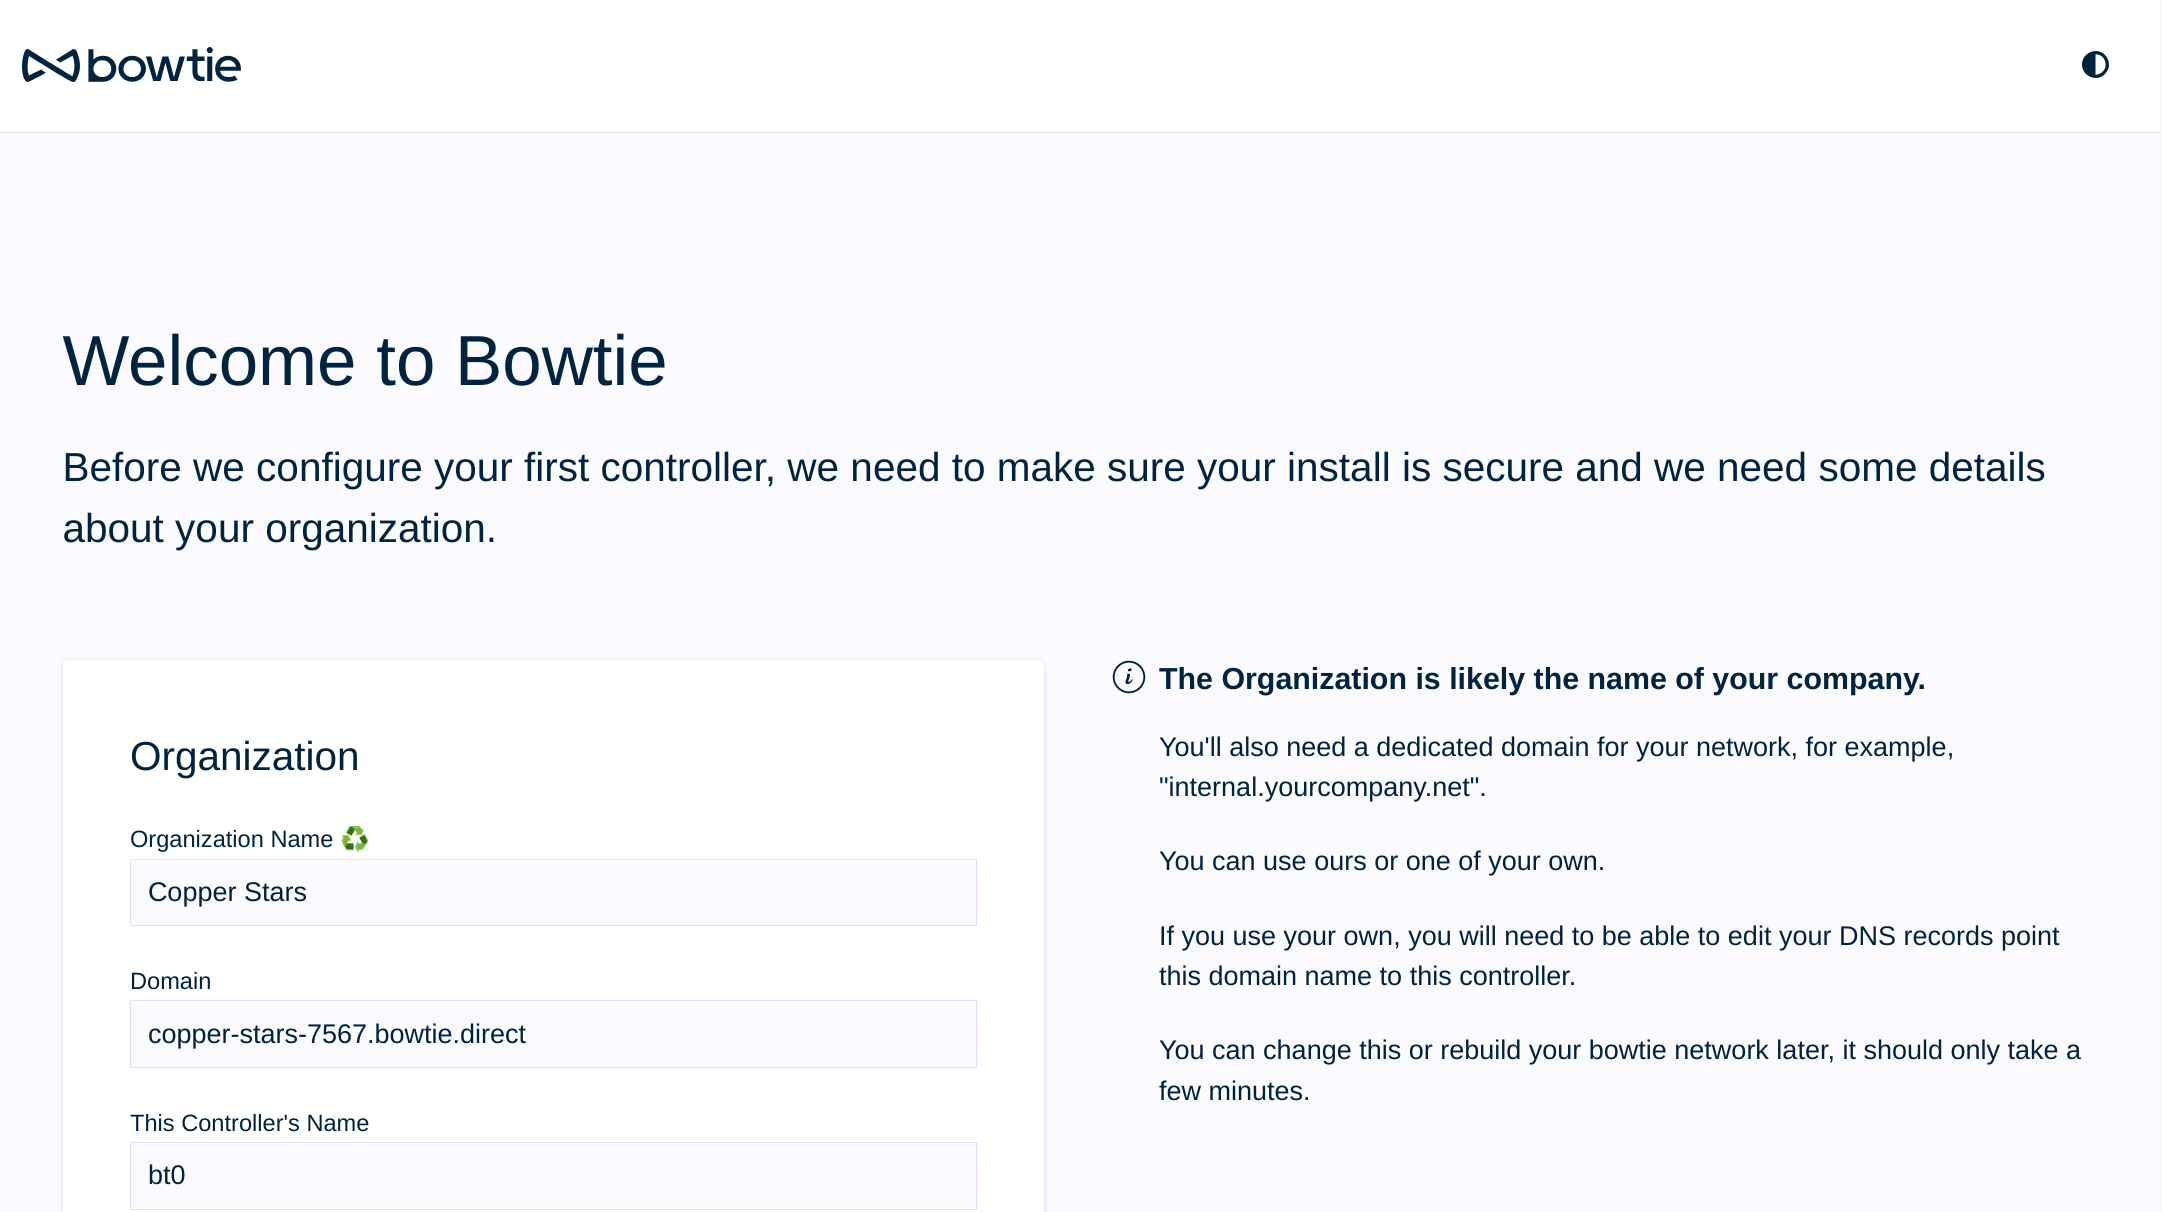
Setup Organization
Use this section to inform your new Controller about your organization.
Setup TLS
Two operating modes are supported: either bring-your-own hostname or an automatically-provisioned hostname served under a Bowtie domain for convenience.
As long as the Controller IP address is publicly-reachable, you may rely on a dynamic bowtie.direct name for ad-hoc configuration without any need to configure DNS manually.
If you prefer your own DNS hostname, please ensure that the desired name is directed at the Controller’s public address and fill out the fields for domain and Controller name as necessary.
bowtie.direct
Without a custom domain, the bowtie.direct domain is provided as a convenience to facilitate TLS without creating your own DNS records and avoid TLS errors with an approach like plain public IP addresses.
Bowtie provides a hosted API that negotiates and provisions bowtie.direct names automatically if you do not configure your own DNS records.
This service is optional and does not require any additional configuration if you decide to use this approach.
In either case, you must configure TLS to proceed because the remainder of the setup sequence configures settings that should be secured via HTTPS encryption. You may rely on either the default self-signed certificate or your own hostname and certificate to change these fields over HTTPS.
Controllers support automatic TLS via the ACME protocol as long as the requisite ports are open and you provide the Controller’s endpoint.
In the case of self-managed bring-your-own certificates, you may use the setup page to upload them to the Controller, load them at boot time with cloud-init, or after initial boot by copying your TLS key and certificate to /etc/ssl/controller-key.pem and /etc/ssl/controller.pem.
System services will watch for the appearance of these files so no additional steps are necessary to load them.
Once you’ve defined a hostname and chosen the TLS acquisition method, proceed to establish HTTPS before proceeding to the next steps:
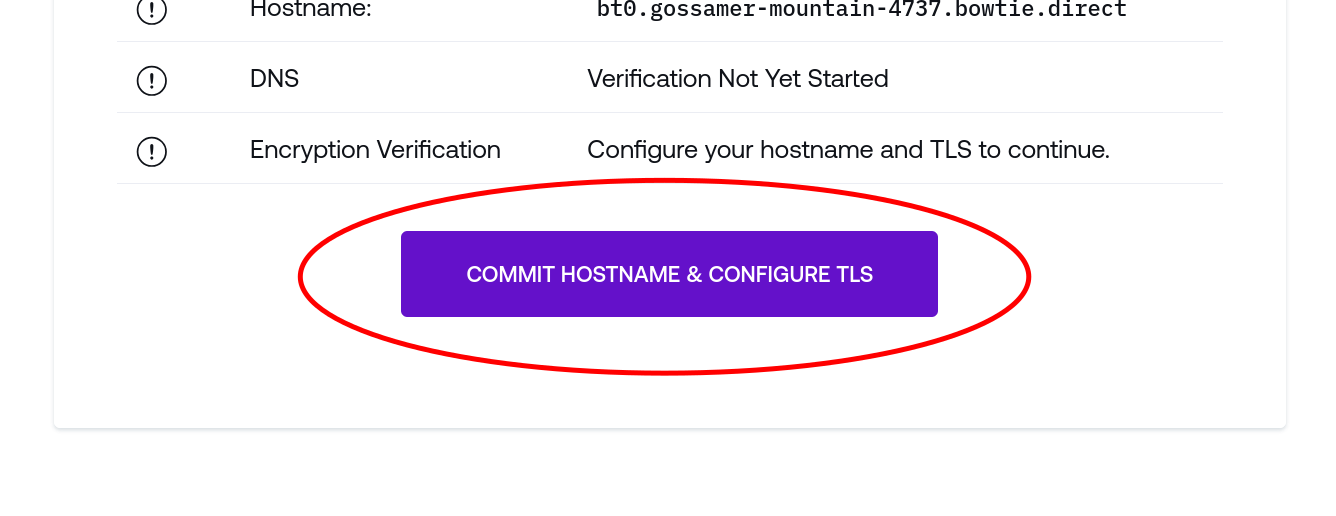
The web application will perform any steps necessary to provision a domain, TLS, and other hostname settings before transitioning to an HTTPS connection. The remainder of the form will appear once a TLS connection is active.
Set Re-authentication
You may be prompted to re-enter your initial setup key before proceeding.
First User
Follow the instructions to create the first user for this Controller. Note that:
Password strength requirements are enforced
The first user is granted superuser privileges
SSO may be setup afterward
Pre-provisioning the first user
If you prefer to perform this step as part of your infrastructure automation, refer to the section on pre-seeding users with cloud-init.
Site Name
Follow the indicated instructions to establish a Site Name.
Address Ranges
Your Controller will attempt to auto-detect a network range suitable for initial configuration. Confirm that the pre-populated address range correctly reflects the private network range that this Controller is intended to serve.
For example, if you launched a Controller into a AWS VPC with the range 172.128.0.0/16, enter this CIDR notation to indicate that the Controller is capable of routing traffic for addresses that fall within the range.
Save and Validate
The Save and Validate button will confirm that all fields are valid and bootstrap your new Controller. After clicking Save and Validate, you’ll be taken to your Controller’s login page. Log in with the user credentials you entered on the Setup page to arrive at a landing page with additional configuration setup instructions.
Congratulations! Your Controller is configured and ready for use. If you haven’t already, you may want to setup SSO now. Otherwise, continue to either Multi-Controller Setup to setup additional Controllers or proceed directly to Client Setup to start connecting Clients to your private network.
SSO
You may load SSO configuration files in one of two ways:
At system boot time via cloud-init. See the item about configuring SSO files to define these files when launching the Controller image.
Alternatively, you may load these files after initial launch. Reference SSO Configuration for more information. This approach is suitable for cases such as using
scpto copy over configuration files.
Note that with most SSO providers, you will likely need to add your controller’s HTTPS endpoint as an authorized callback URL when configuring a new SSO application for your Bowtie controller. To do so, when creating a new SSO OAuth application in a provider such as GitHub or GitLab, assuming that your controller’s endpoint is https://controller.net.example.com, use the following callback URL:
https://controller.net.example.com/dex/callback
Please refer to Single Sign-On for complete documentation about how to configure SSO for your Controller if you need additional help or more information.
SSO Access
Please take special care to restrict access to a specific group when configuring SSO. Failure to do so may mean that any user able to authenticate with any Google, GitLab, or other provider will be granted access to your private controller administrative interface.
Once complete, you may authenticate using the chosen provider for various endpoints, including:
The administrative console at the root of the controller’s HTTPS endpoint.
The instrumentation tools at
/grafana
Scrape Configuration Files
If your deployment requires additional Prometheus scraper configuration files, you may stage those YAML files here for installation upon setup finalization.
The contents of files listed here should adhere to the Prometheus scrape_config schema and will be collected by the scrape_config_files setting.
Summary
After completing these steps, your Controller should be operational! Congratulations! You should proceed to either:
Client setup to let end users join the private network, or
Multi-Controller Setup to setup additional Controllers in a highly-available configuration. The steps for Multi-Controller Setup largely follow the patterns in this setup documentation with a few small changes to initiate clustering.
Configure Backup and Restore to safeguard your data to a location like S3 or
minio.
Controller SoS is available in the event that you need additional support to troubleshoot any lingering issues.