Client Operation
Each Bowtie Client installed on a network device is responsible for managing that device’s connection to the organization’s Bowtie network. The steps to set up a Client are intentionally simple, so there is little (if any) further interaction required to operate a Bowtie Client after initial setup. For most users, the documentation listed here should be unnecessary (assuming no problems). If you’re experiencing connectivity problems or other issues, please refer to the Client troubleshooting documentation .
However, the Bowtie Client software still accepts a number of configuration options if you’d like to customize it further.
Network Configuration
Network configuration for the Bowtie network in general should be done through the Controller administrative web page. The options listed here apply to Client installations which are typically present on workstations, laptops, and other endpoint devices.
Client Interface
The Bowtie client installs a tray icon that provides additional information and the ability to login to its Controller endpoint. On Windows, you may need to expand the system tray:

The Bowtie client tray application is represented by the Bowtie icon:
Tray on Windows |
Tray on Linux |
|---|---|
|
|
Tray on MacOS |
|
|
|

Click or hover the cursor over the tray icon to display current connection information:

Each field in the tooltip displays an aspect of the running client’s current state. The following screenshot presents an example tooltip with several menu options:
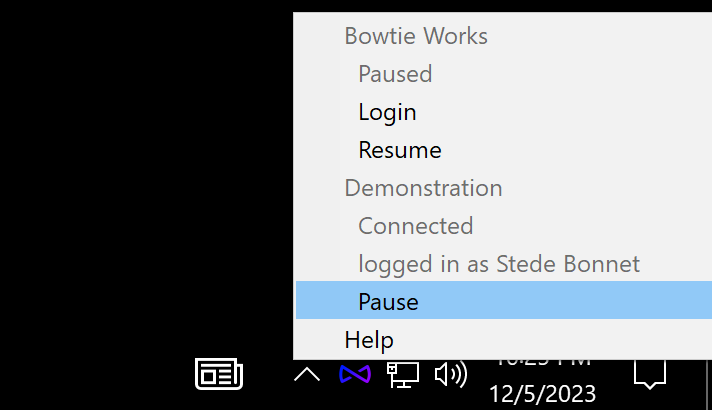
The two top-level fields called Bowtie Works and Demonstration denote the organizations (as configured in the Controller’s settings) that the client is connected to. In this screenshot, the client service is connected to two separate organizations. In most cases, your client will be connected to only one organization, but more than one organization (and associated private network) is a supported mode of operation.
The fields nested underneath the organization name include:
The current connection state. The possible values for this field include
Pending,Connected,Disconnected,Paused, andConnecting.The logged-in user’s name. If the user has not yet authenticated, this field is instead a button labeled
Loginthat may be used to open an authentication page directed at the Controller that this client is configured to use.A connection toggle button. When this field is labeled
Pause, you may click it to temporarily halt the connection to the configured private network and the connection state label will becomePaused. ClickingResumewhen the connection state isPausedwill restore the private connection to aConnectedstate.
The last top-level label
Helpis a clickable button that opens a window with additional information about the client in the event that troubleshooting is necessary.
Client Help
The Client help page provides several sections to aid with support and informational diagnostics:
Client Assisted Support
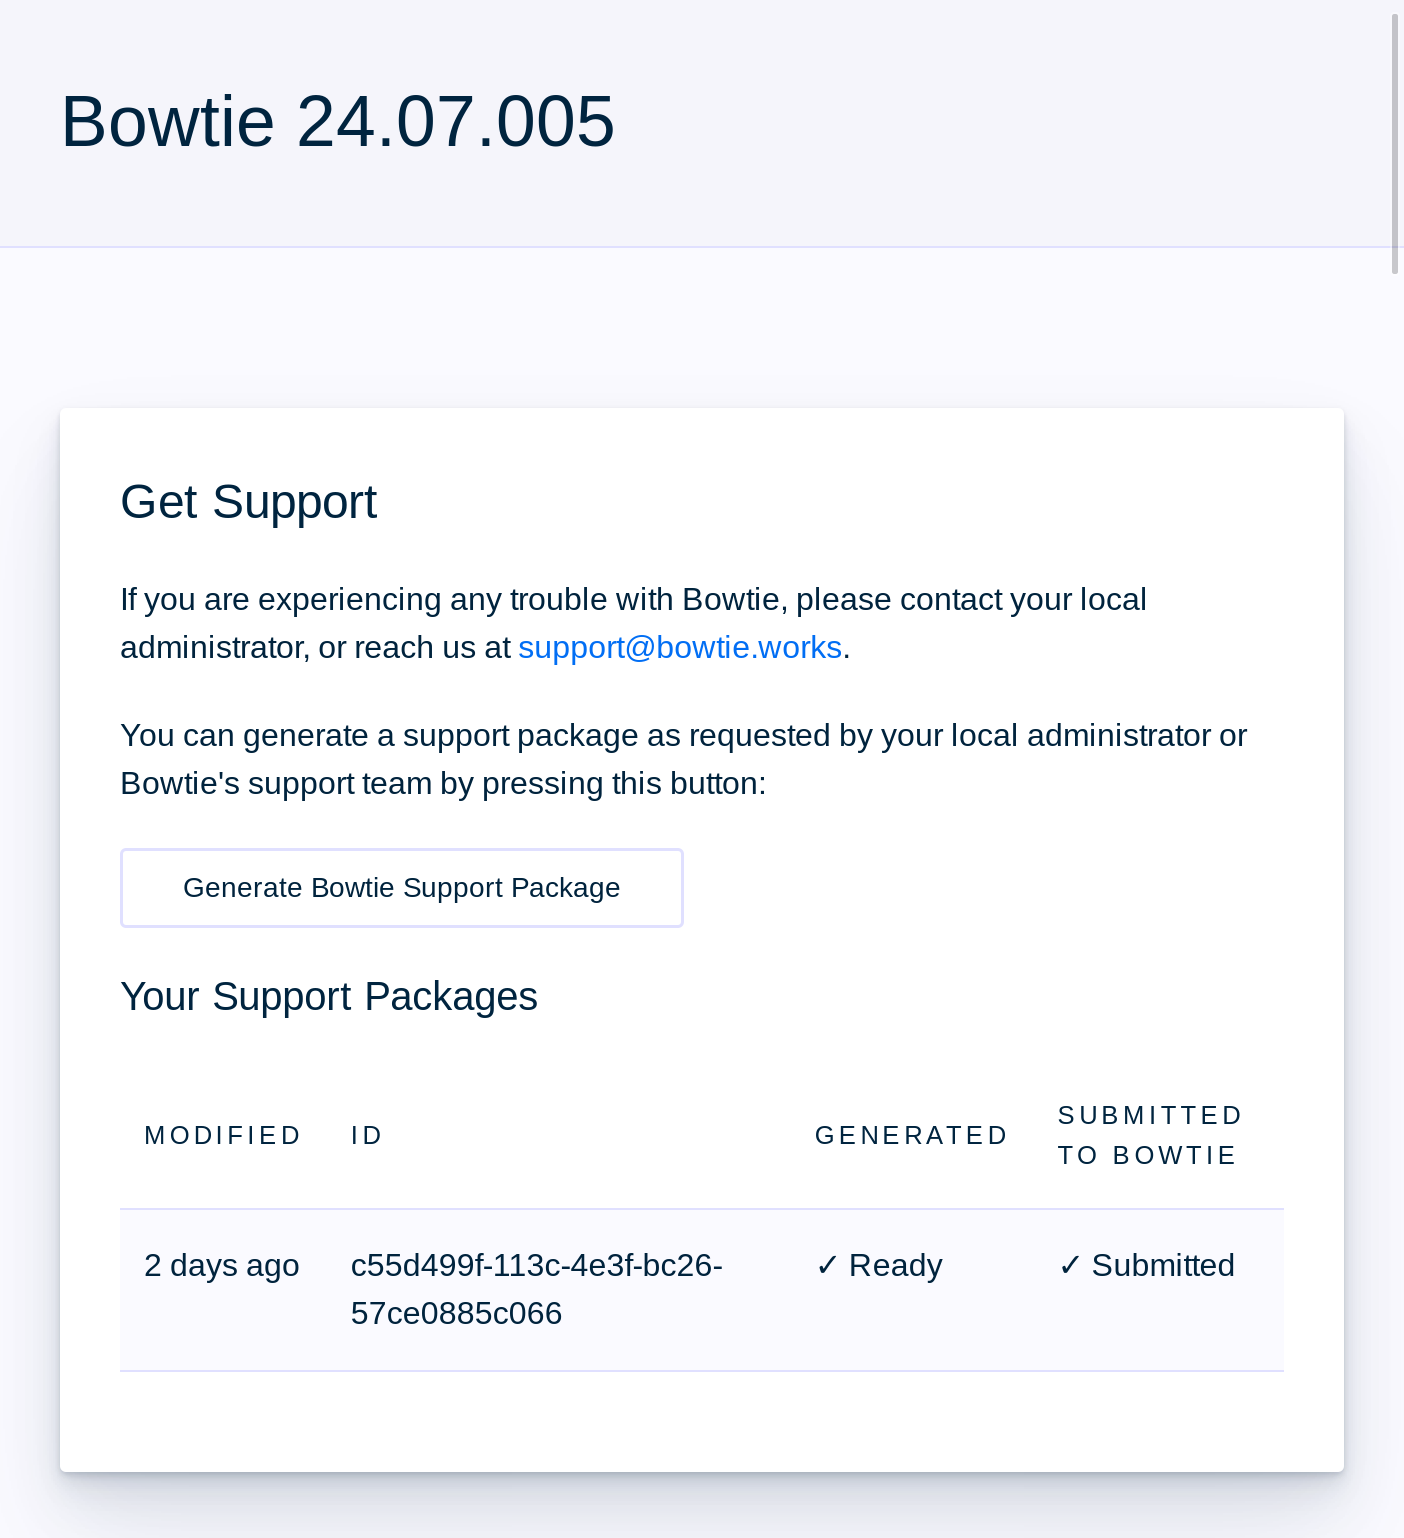
Get Support includes a button labeled Generate Bowtie Support Package. This “SoS” feature will collect diagnostic information and deliver it to Bowtie to aid with assisted support along with a Bowtie representative.
Any support bundles generated and delivered to Bowtie will expire and be removed from our systems after a period of time (usually 30 days). Bowtie does not collect any personally identifiable information as part of this collection process.
Invoking this functionality will:
Collect host diagnostics to help debug Client operation.
This includes, but is not limited to, system information like routing tables, hostname, and service logs.
Send this payload to Bowtie, where we will store the support bundle along with metadata to help identify its source, like the Bowtie Client’s configuration file.
After generating and sending the support bundle, support staff at Bowtie will be notified about its arrival. Reach out to a Bowtie representative to continue troubleshooting with their assistance.
Client Connection information
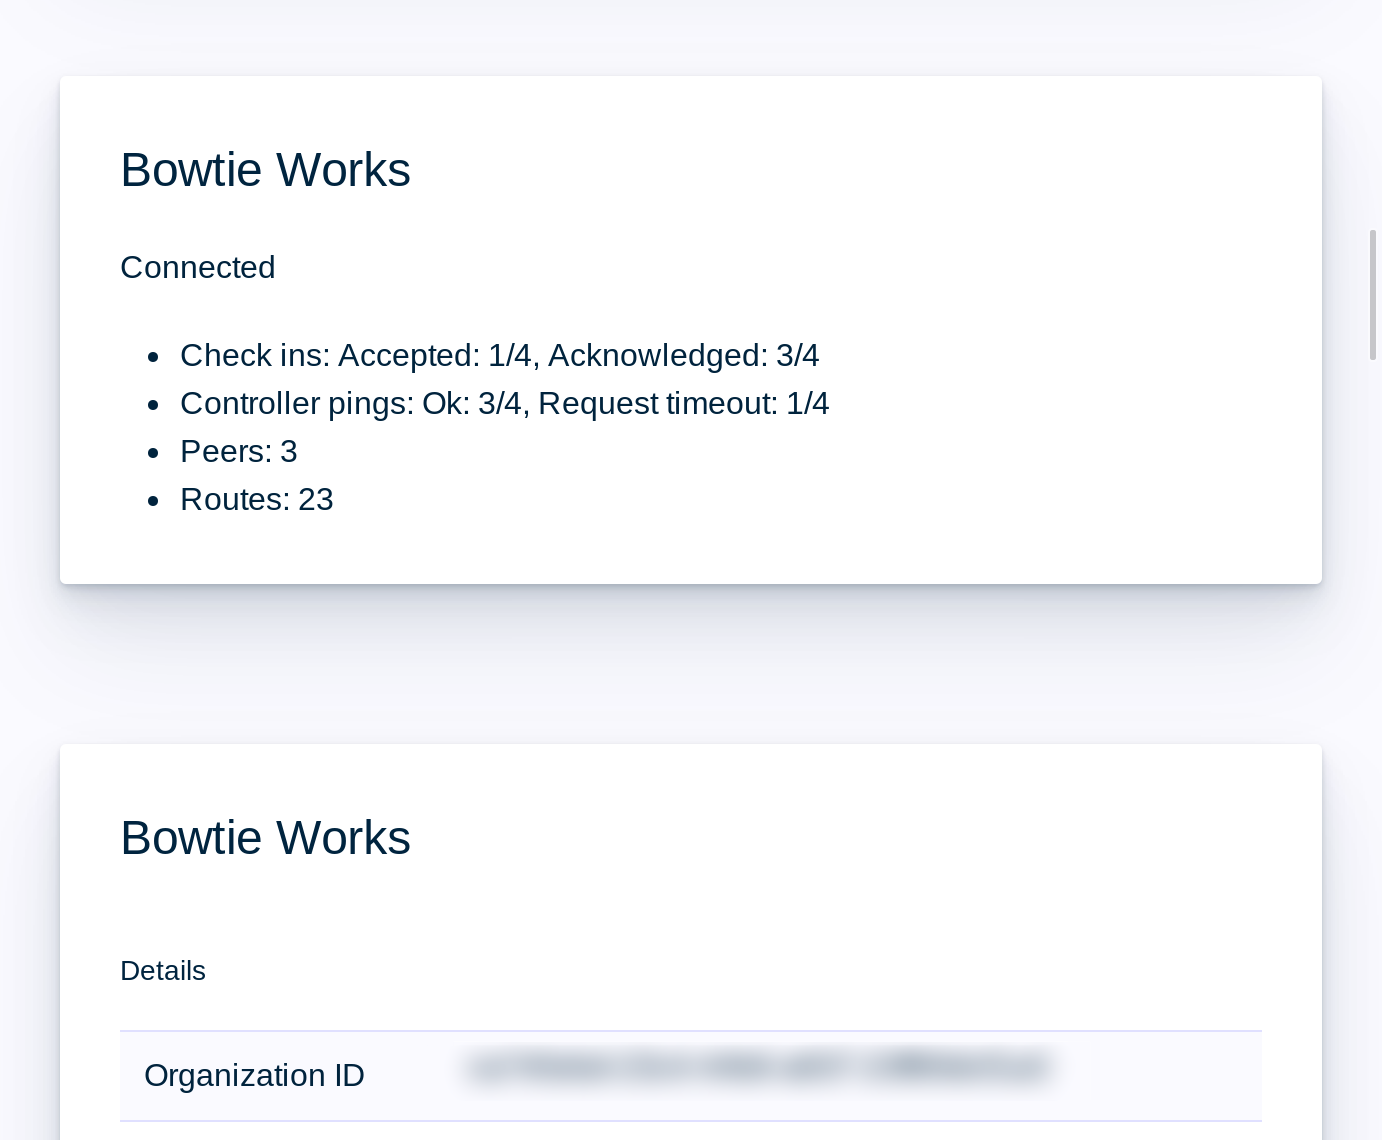
Beneath the Get Support section of the Client help page are several sections dedicated to client service information.
The first section displays the current organization name (in this screenshot, Bowtie Works) along with technical information about current connections. This list displays information about Controllers this client has reached recently, the health of known Controllers, and peers as well as routes present in the control plane setup by your Bowtie Controllers.
The following section includes more details about the Client’s connection to the Controller and broader organization. This information is exposed primarily to aid during troubleshooting, but you will find a wealth of information here about active connections, current network configuration, and more.
Client DNS Help
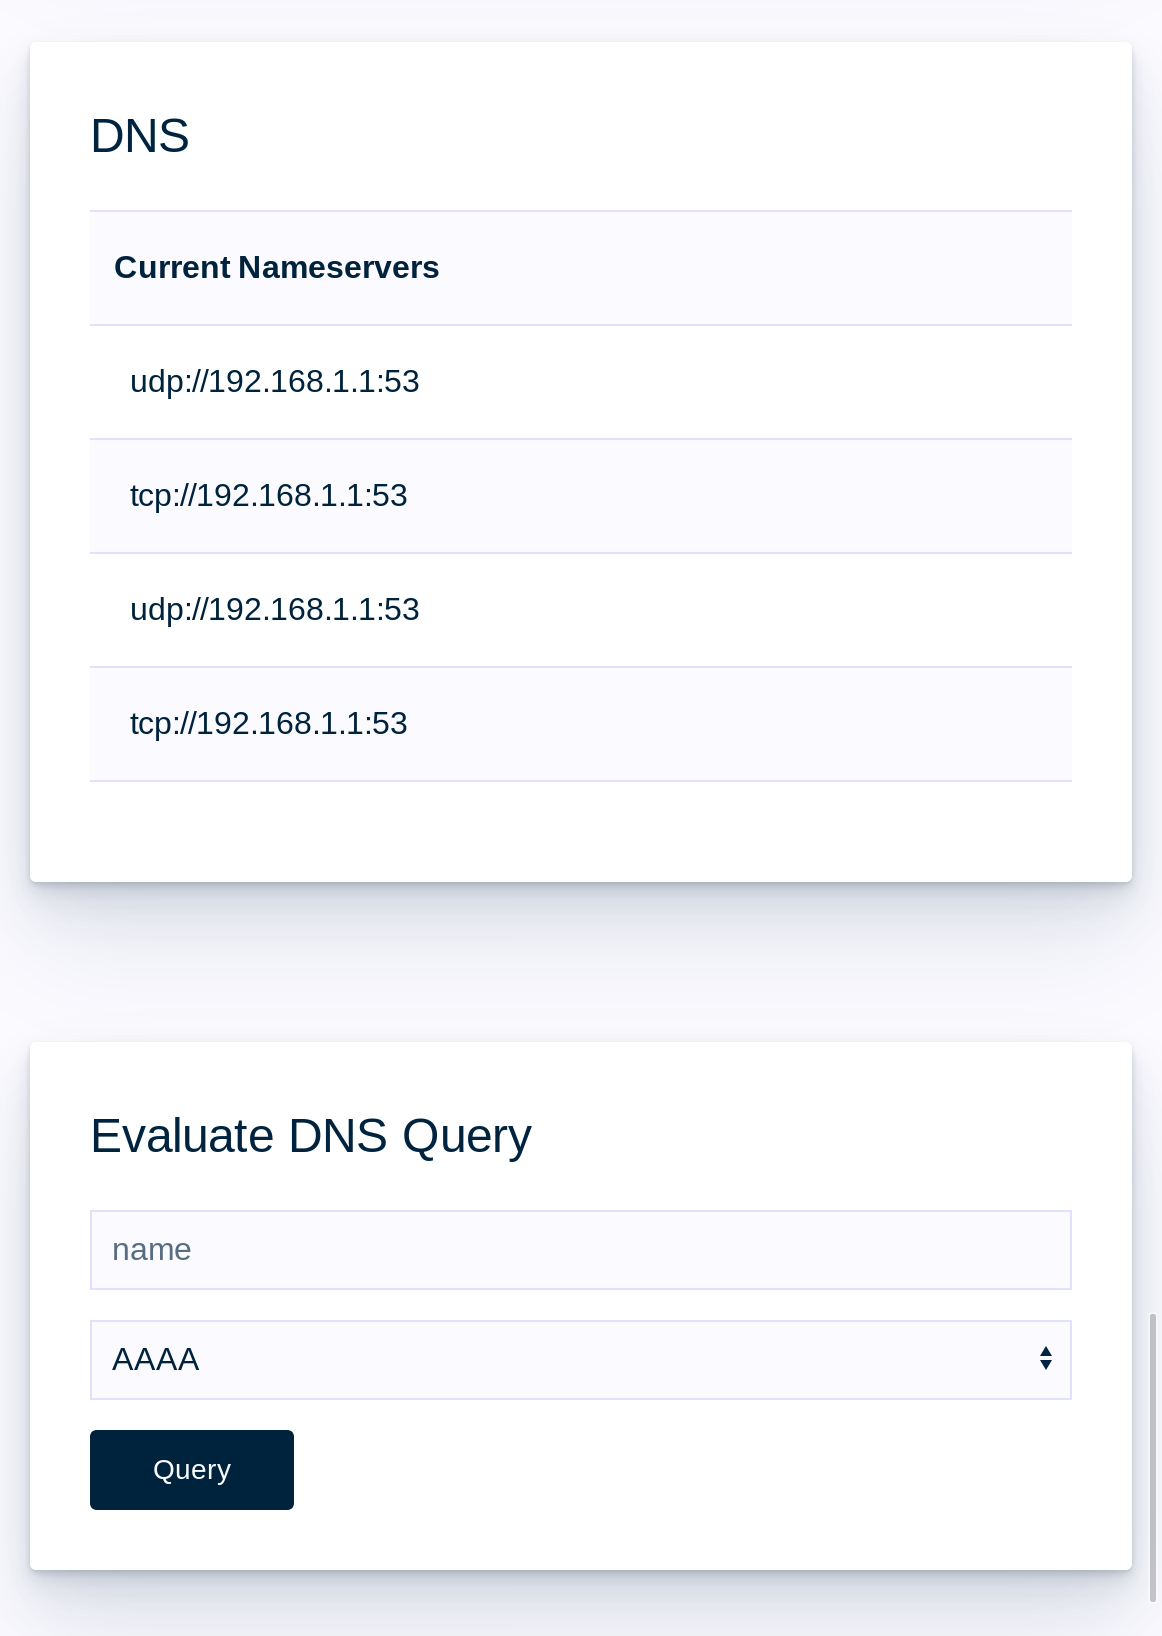
The next sections pertain to DNS:
Under DNS are the nameservers that the Bowtie Client will use to forward any requests that it should not forward to its Controllers for name resolution. These nameservers are drawn from the host operating system’s APIs.
Evaluate DNS Query provides a small interface to interactively test how names resolve when passed through the local Client’s DNS resolution logic. Use the test box to enter an arbitrary name and select
AAAAorAto query IPv6 or IPv4, respectively.Some possible results from queries include:
Forwarded: The request was forwarded to upstream nameservers noted in the DNS section.
Domain-Rule-Response: The name was captured by a rule and forwarded to a Bowtie controller to then be resolved against a private nameserver.
Dropped-On-Block-Hosts: The name was matched to an entry in the DNS Block Lists and dropped without providing a routable address.
Connection Configuration
The Bowtie Client must be pointed at a Controller server endpoint via command line options or a configuration file before use.
Configuration files are in the TOML file format. The default directory for configuration files is:
Windows:
%PROGRAMDATA%\bowtie– on most systems this isC:\ProgramData\bowtieMacOS and Linux:
/etc/bowtie/configuration/
All files in the configuration directory will be loaded by the Bowtie Client.
Convention is to name configuration files after the name of your organization. For example, if your organization is called “Foo”, the configuration might be named /etc/bowtie/configuration/foo.conf.
The entrypoint configuration option is a list of one or more Bowtie Controllers.
For example, in Controller Setup, a Bowtie Controller is installed at https://example.com.
On Windows, you would create a file at C:\ProgramData\bowtie\configuration with the following contents:
entrypoint = [ "https://example.com" ]
If you have more than one Bowtie Controller installed, we recommend that you configure more than one entrypoint in the following way:
entrypoint = [ "https://example.com", "https://backup.example.com" ]
However, this is not strictly required and primarily serves as a fail-over mechanism to ensure the Client has multiple options at startup time.
One entrypoint is sufficient for the Client to bootstrap its local configuration. Once connected, it will discover and remember the other entrypoints.
See Fail-over Behavior for how the Client uses its connections to fail over between Controllers.
For additional configuration settings and their purposes, see Advanced Configuration.
Advanced Configuration
Bowtie Client options may be controlled through the Bowtie configuration file or by specifying parameters on the command line.
Configuration options may be listed by running bowtie-service --help.
Any command-line option may be specified in the configuration file with the exception of the --config-directory option.
Configuration files are in TOML format.
To specify a command-line option in the TOML file, replace dashes - with underscores _ in the command-line option name when including them in the TOML configuration file.
Option listed in --help output as flags such as --bowtie-dns-quiet (that is, command-line options that do not accept arguments) should be specified as booleans in the TOML file.
For example, to turn on the --bowtie-dns-quiet flag, add bowtie_dns_quiet = true to the TOML file.
Options such as --entrypoint, --local-dns-listen-address-ipv4, and --local-dns-listen-address-ipv6 can be specified multiple times on the command line.
In the TOML configuration file, these parameters should be entered as arrays. For example, the option --dns-listen-address-ipv4 could be specified as dns_listen_address_ipv4 = ["127.0.0.53", "10.0.0.53"] in the configuration file.
Organization specific options (such as entrypoint) are compartmentalized to each configuration file.
For example, if you belong to two different organizations, put the entrypoints for each organization into separate configuration files.
Client Service
After installation the Bowtie client should start automatically. The Bowtie client functions with two separate services: the Bowtie client system service and the Bowtie client tray applet user service. The system service is automatically started on boot and the tray applet on login. In Windows, the system service is a service and the tray applet is a user startup application.
For any supported operating system, the Bowtie client service and related frontend/tray service should appear in the canonical places that system services are managed:
On Linux, the network service appears under the
bowtie-servicesystemdservice and the user-facing service runs under thebowtiesystemduser service.On MacOS, the Bowtie network service appears as a
LaunchDaemonmanaged bylaunchctl. The tray application runs as aLaunchAgentmanaged bylaunchctl. Both may be managed as typical MacOS services.On Windows, the Bowtie network service is a typical Windows service that can be managed using the Services application. The tray application is started on Login via the registry key
\\HKEY_LOCAL_MACHINE\Software\Microsoft\Windows\CurrentVersion\Run.
If the Bowtie client does not start after installation or a reboot, see the Bowtie Client section of the Troubleshooting documentation.
Local Database Maintenance
The Bowtie client keeps a small local database of diagnostic and telemetry data. It is bounded and self-maintaining, so no routine maintenance is required.
If you need to reclaim disk space (for example, after the database grew during an incident), fully restart the Bowtie client system service. On startup the service compacts its local database, reclaiming any free space. Pausing and resuming the client does not trigger this — a full service restart is required.
Local DNS Configuration
Some Bowtie functionality is delivered through DNS, so the Bowtie client includes a DNS system that runs locally. By default, this DNS client listens on 127.0.0.53:53. With the default configuration, when bowtie-service is started, bowtie-service will:
Read your current DNS settings
Configure
bowtie-dnsto forward non-Bowtie DNS requests to the servers you are currently usingPerform health checks, and if successful
Start
bowtie-dnsConfigure your OS’s DNS settings to use
bowtie-dns. (127.0.0.53by default).
Bowtie then watches for network changes and adjusts DNS settings if appropriate.
Linux has several different mechanisms for discovering and configuring DNS settings. Therefore, Bowtie has several different mechanisms for discovering and configuring DNS settings. Windows and MacOS do not, but the upstream options are still available and may be useful in unusual situations.
Linux Upstream DNS Configuration
Most Desktop Linux distributions use NetworkManager to discover and manage upstream DNS configuration.
NetworkManager passes the DNS configuration on to systemd-resolved.
This configuration is placed in /var/run/systemd/resolve/resolv.conf.
The Bowtie client will read the upstream DNS configuration from this file if it is available.
If /var/run/systemd/resolve/resolv.conf is not available, the Bowtie client will attempt to query NetworkManager directly.
Instead of attempting to auto-configure, Linux upstream DNS may be configured more directly by using the upstream_dns_provider option.
This option may be set to smart, nmcli, resolv-conf, static, or none.
See --help for more details.
To use upstream_dns_provier = "static", add a line like:
upstream_dns = ["1.1.1.1", "8.8.8.8"]
to the configuration file, or invoke the Bowtie client with the appropriate command-line flags. For example:
bowtie-service \
  --upstream-dns-provider=static \
  --upstream-dns=1.1.1.1 \
  --upstream-dns=8.8.8.8
To use upstream_dns_provider = "resolv_conf", add a line like:
upstream_resolv_conf = "/run/systemd/resolv/resolv.conf"
Do not pass /etc/resolv.conf to as upstream_resolv_conf to Bowtie.
Once the Bowtie client has injected its DNS configuration, /etc/resolv.conf will directly or indirectly point to bowtie-dns, so using /etc/resolv.conf for upstream_resolv_conf will likely result in an infinite loop.
However, you can point to a resolv.conf located elsewhere with the upstream_resolv_conf option.
Uninstall
The Bowtie client strives to operate as a typical system software package and thus should be managed as most other software packages depending on the desired operating system.
Windows
Open the Add/Remove Programs control panel from the start menu:
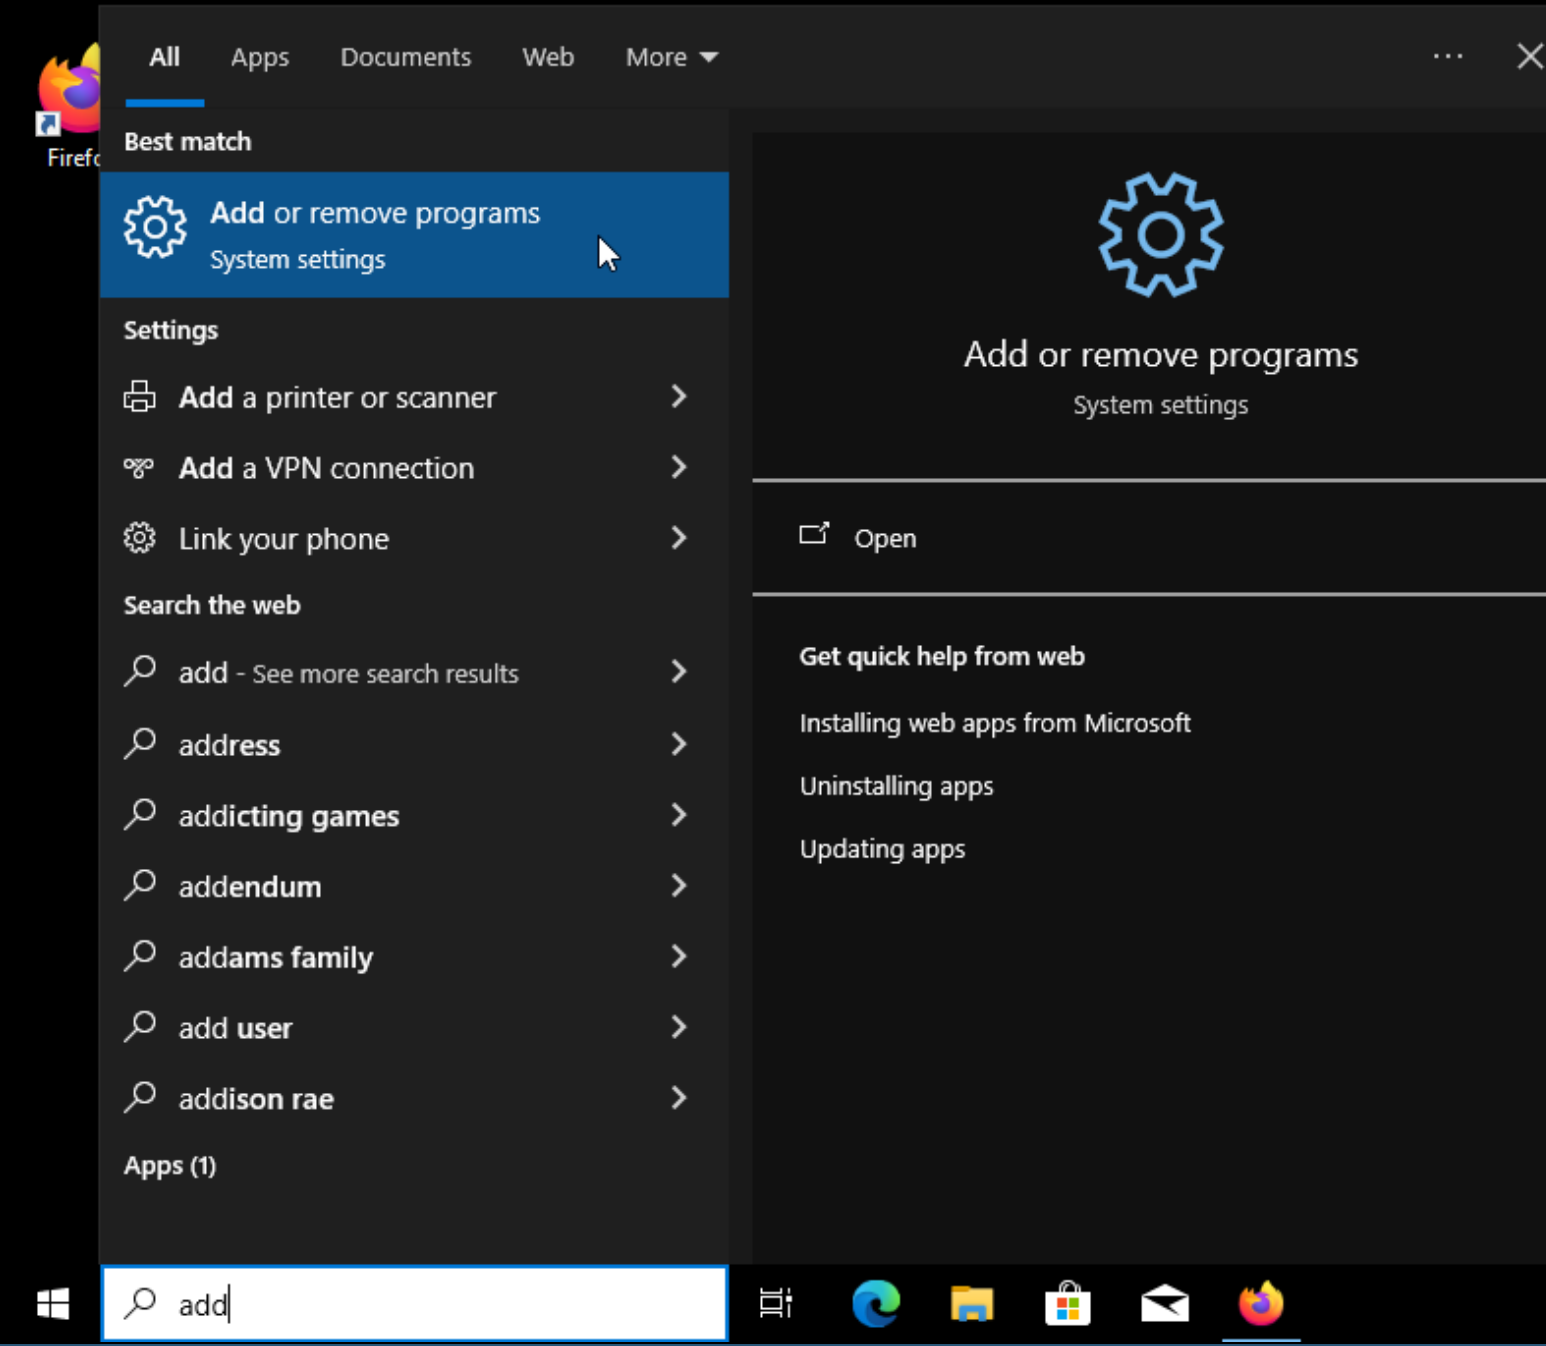
Navigate to the Bowtie package in the Add/Remove Programs settings window and click Uninstall:
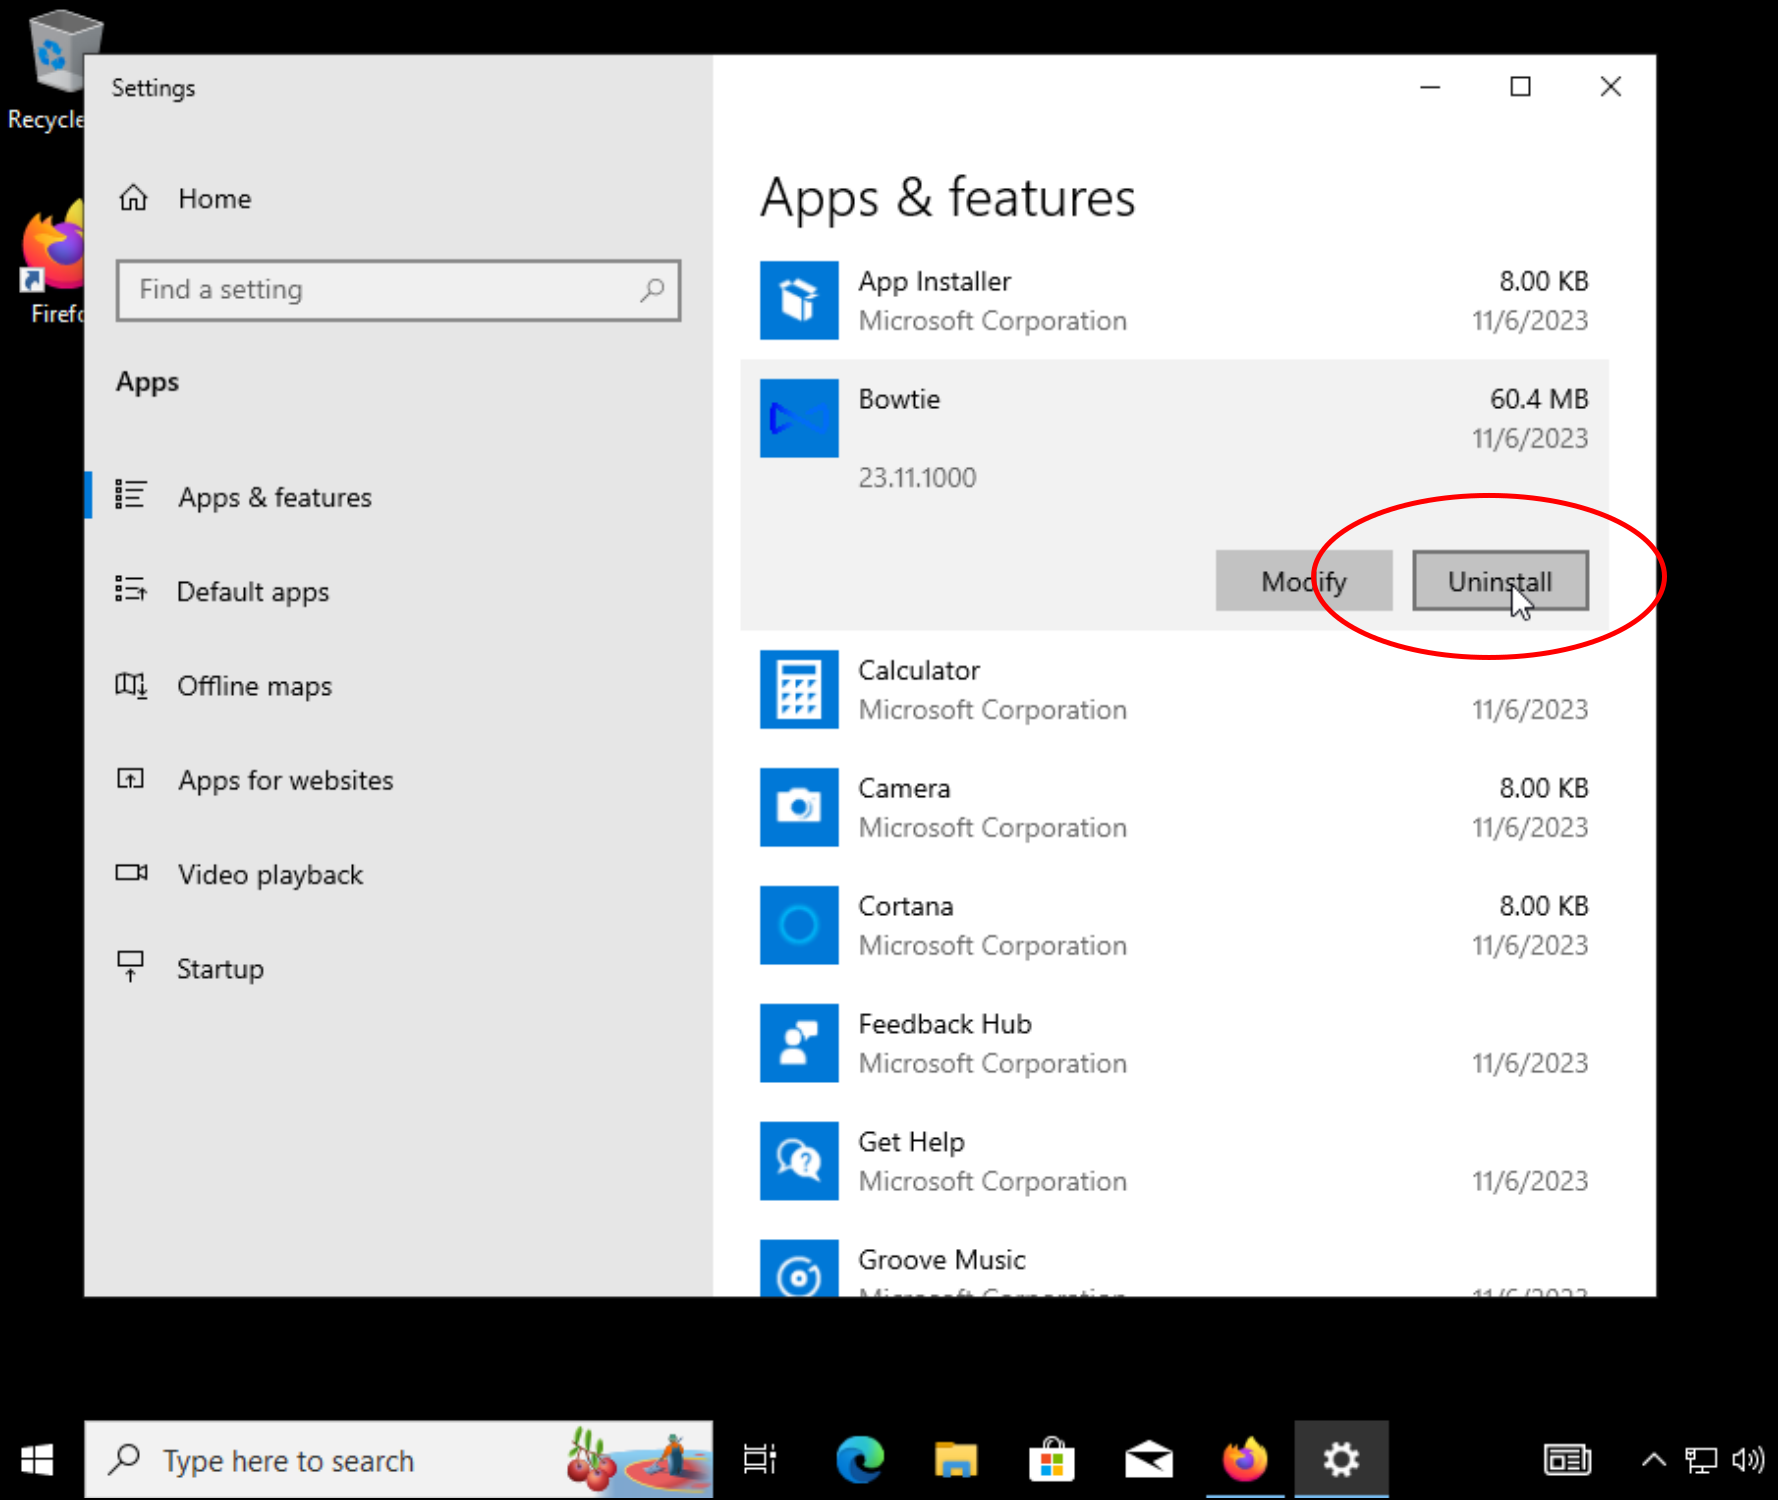
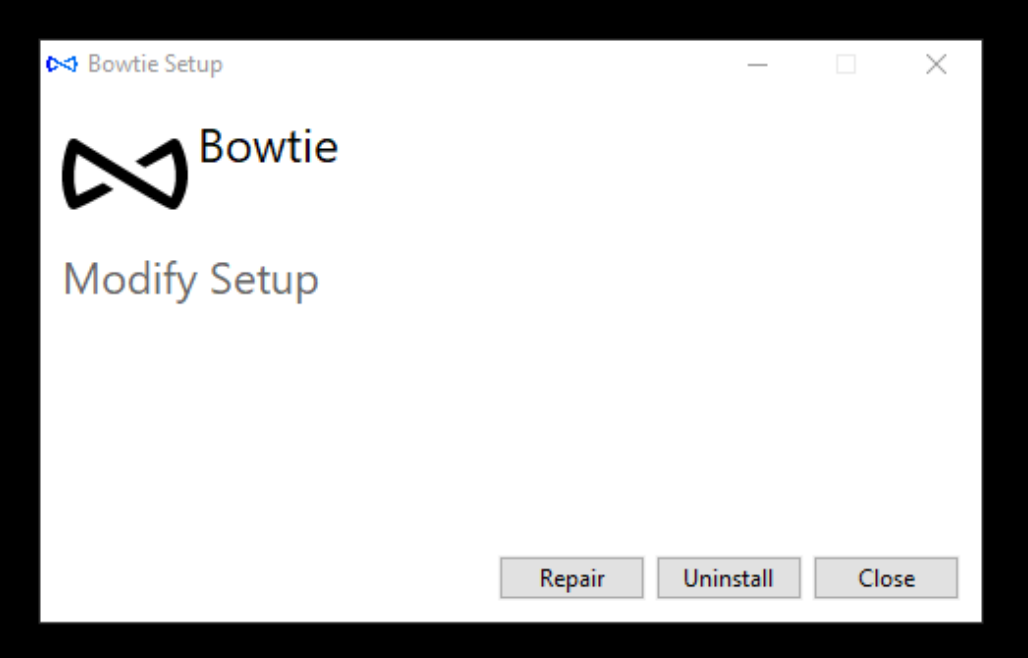
A window to customize the Bowtie installation will open. Select Uninstall:
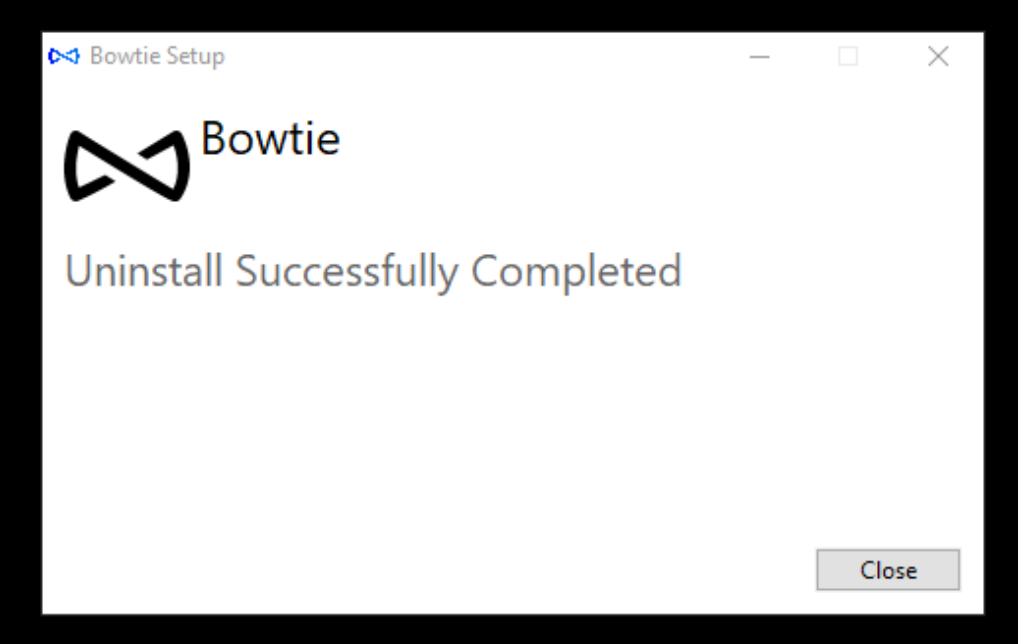
The uninstall process will display success once completed.
MacOS
Open Terminal.app or another terminal application and run bowtie-ctl uninstall with elevated permissions using sudo:
sudo bowtie-ctl uninstall
The Bowtie service will stop, restore the network configuration, and remove itself from the system and from any startup settings.
Linux
Ubuntu
Uninstall the bowtie-service package:
sudo apt remove bowtie-service
Enterprise Linux
Stop any running Bowtie daemons:
systemctl --user disable --now bowtie-gtk
sudo systemctl disable --now bowtie-{service,dns}
Remove the bowtie-service package:
sudo dnf remove bowtie-service
Arch Linux
Stop any running Bowtie daemons:
systemctl --user disable --now bowtie-gtk
sudo systemctl disable --now bowtie-{service,dns}
Remove the installed bowtie packages. Optionally include -s to remove dependencies introduced by the Bowtie packages:
sudo pacman -Rs bowtie-service
If you installed bowtie-core and/or bowtie-gtk separately, use those package names instead:
sudo pacman -Rs bowtie-core bowtie-gtk
Linux DNS Injection
Rather than blindly writing a DNS configuration to /etc/resolv.conf, the Bowtie client tries to be less intrusive via different configurable strategies.
The potential options that may be passed to the option --local-dns-provider include:
--local-dns-provider=chain-resolved(default)The Bowtie DNS daemon listens on
127.53.53.53, leavessystemd-resolvedon127.0.0.53, and instructssystemd-resolvedto use Bowtie for DNS by placing a file in/etc/systemd/resolved.conf.d/.
--local-dns-provider=replace-resolvedThe Bowtie client will restart
systemd-resolvedallowingbowtie-serviceto claim the binding to127.0.0.53:53. This permitssystemd-resolvedto take over seamlessly (or with a restart ofsystemd-resolved) ifbowtie-servicecrashes.
--local-dns-provider=install-resolv-confAs a fallback, because virtually all Linuxes use
/etc/resolv.confto specify name resolution, this strategy will rename the existing/etc/resolv.confto/etc/resolv.conf.bowtie-originaland install its own/etc/resolv.conf. The file will be restored when the Bowtie client exits. Invokingbowtie-service cleanupwill also restore the file if the client fails to restore the file unexpectedly.